> ## Documentation Index
> Fetch the complete documentation index at: https://docs.contraforce.com/llms.txt
> Use this file to discover all available pages before exploring further.
# Multi-Tenant Features
> Manage security delivery across all your customers from a single unified platform. Built for MSPs and MSSPs.
ContraForce is purpose-built for MSPs and MSSPs managing multiple customer environments. View incidents, run response actions, and monitor security posture across all your tenants—without switching between portals.
Whether you manage 5 tenants or 500, ContraForce scales with your business. All multi-tenant features are included in the platform at no additional cost.
## Why Multi-Tenant Matters
Traditional security tools force analysts to log into each customer environment separately. ContraForce eliminates this friction:
View all customer incidents in one unified dashboard.
SOP workflows automated across every tenant.
One analyst can manage more customers effectively.
***
## Command Dashboard: Your Central Hub
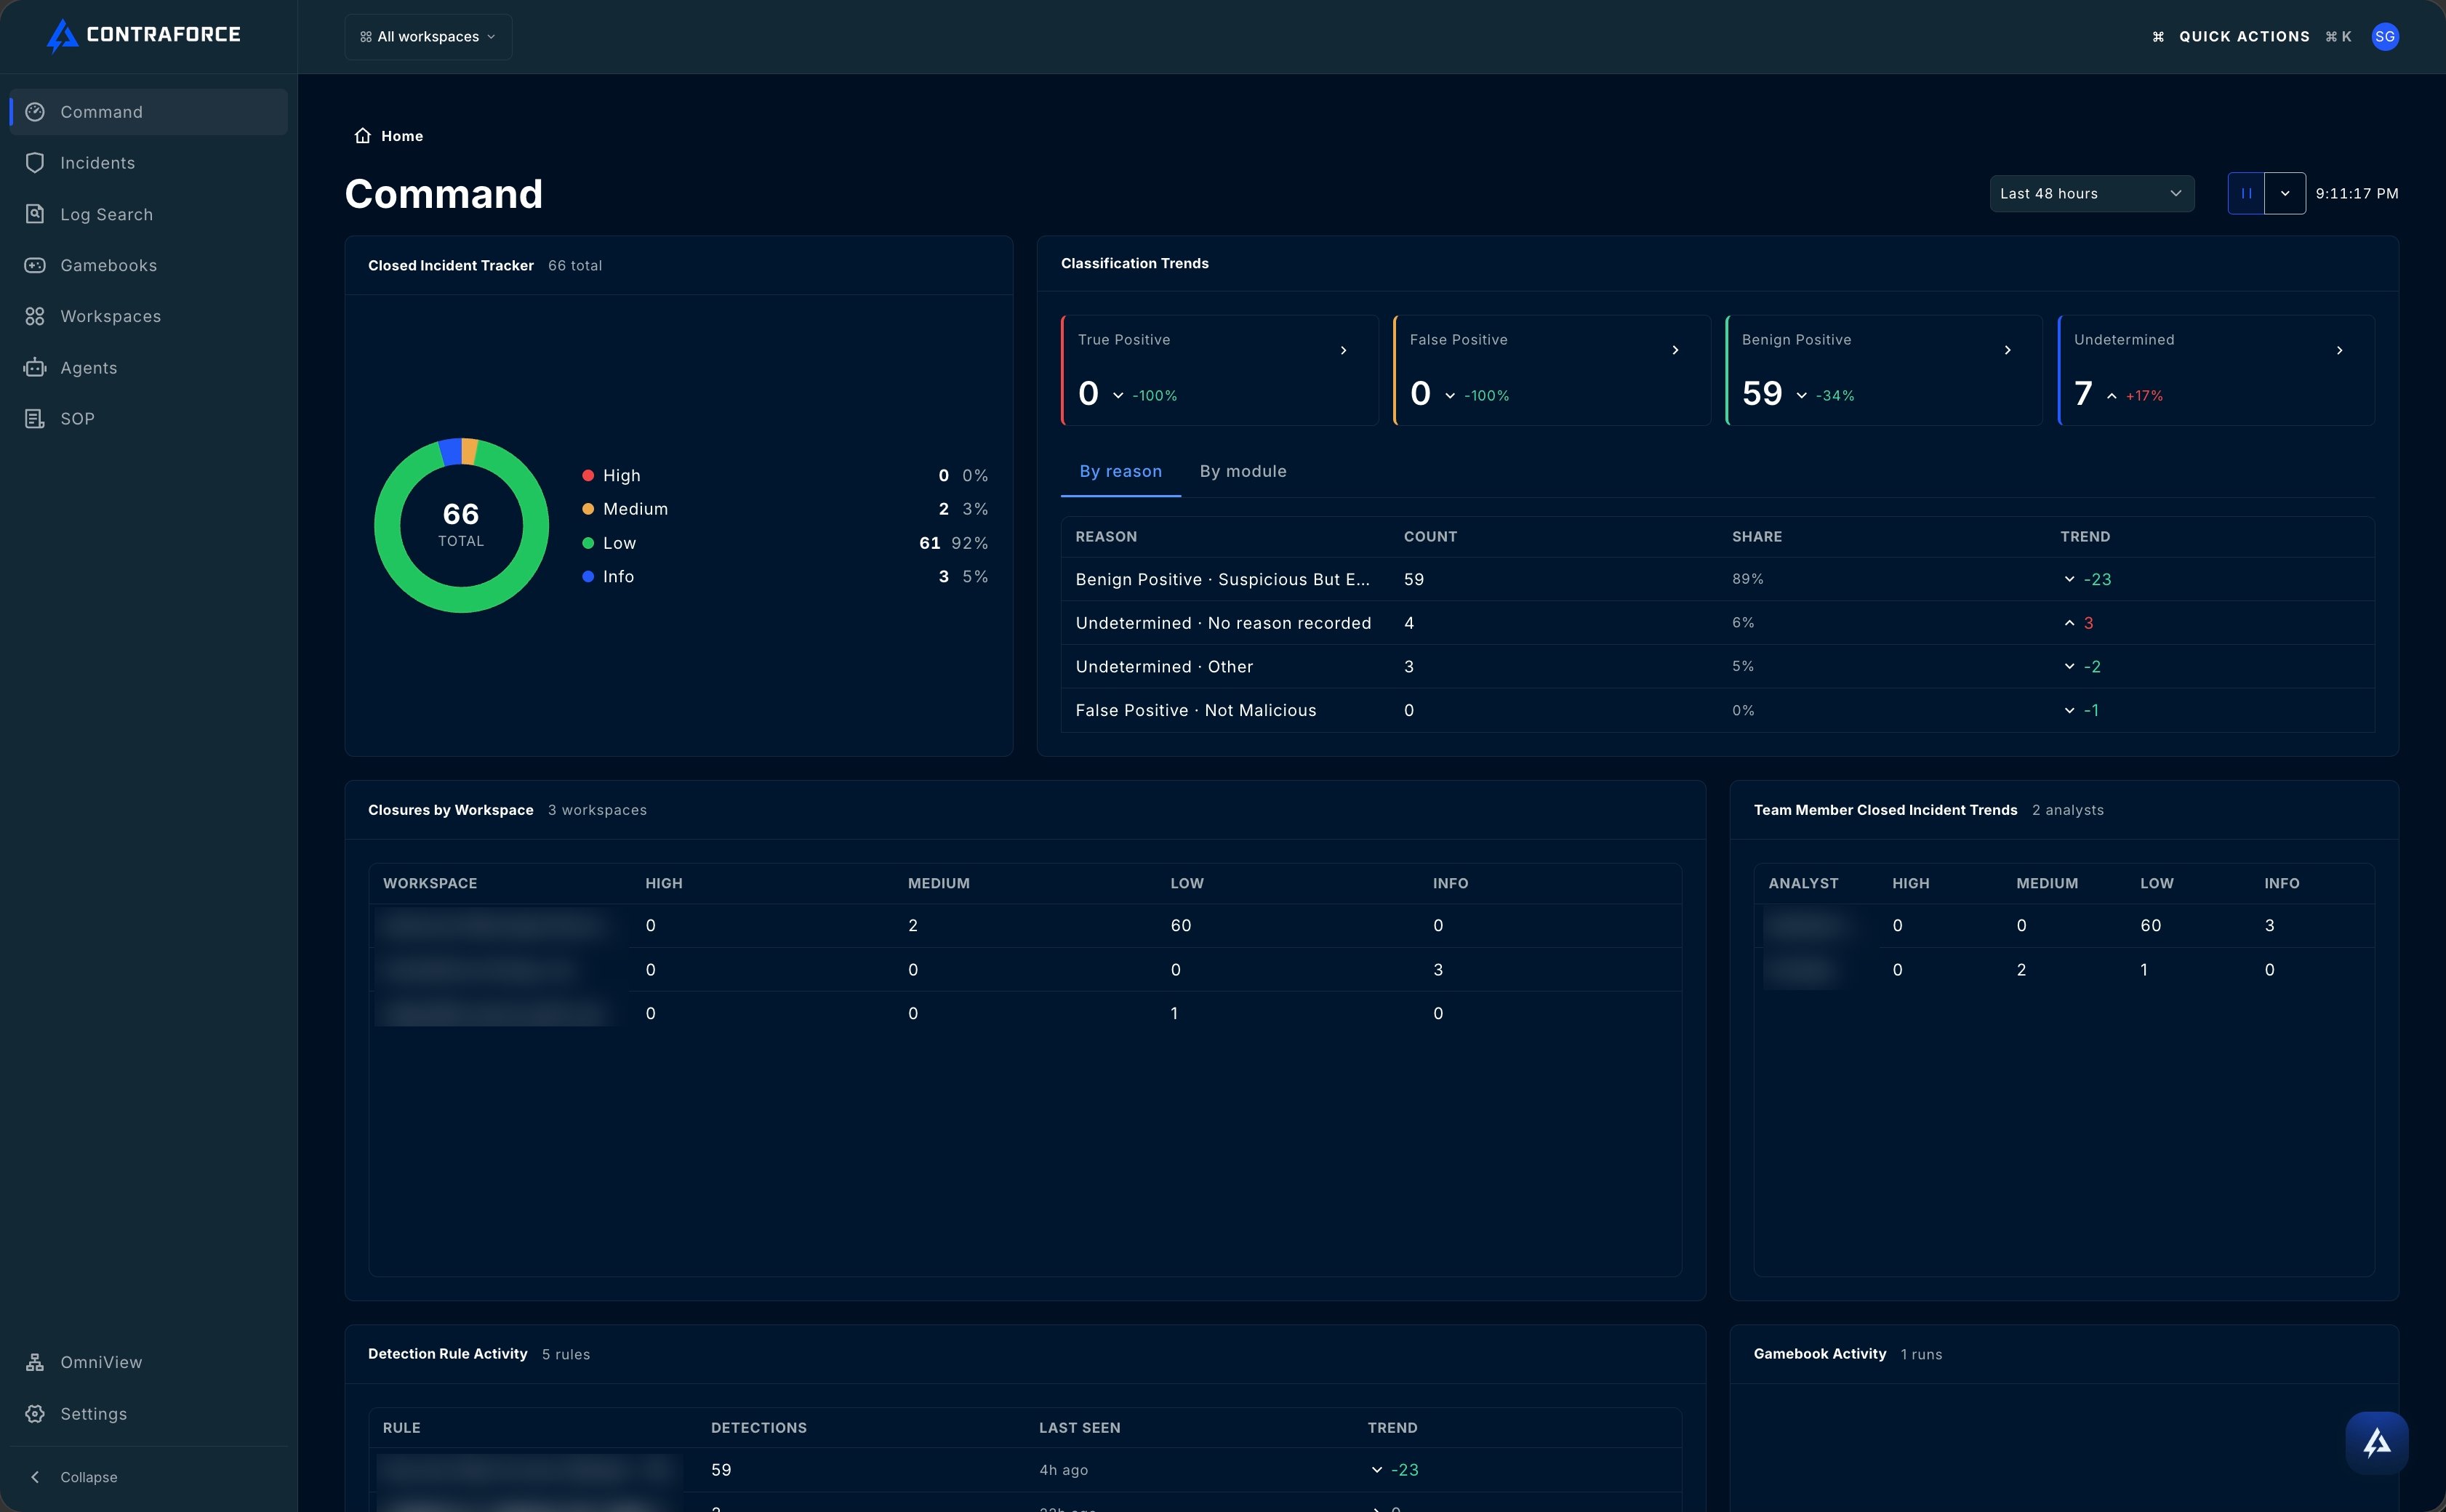
The **Command Dashboard** is the heart of ContraForce's multi-tenant capabilities. It provides a unified view of all security incidents across your managed tenants.
 ### What You Can See
| Function | Multi-Tenant Capability |
| ---------------------------- | ------------------------------------------------ |
| **Multi-Tenant Dropdown** | Filter down on one or many workspaces in seconds |
| **Closed Incident Trends** | Closed incidents trends across workspaces |
| **Incident Rule Trends** | Detections triggered by rules across workspaces |
| **Latest Gamebook Activity** | Recent response actions across workspaces |
### Default Behavior
By default, the Command Dashboard displays data for all onboarded workspaces. This gives you immediate visibility into your entire customer base without any configuration.
Start your day on the Command Dashboard to quickly identify which customers need attention. Trends and recent activity allow you to focus where it matters.
***
## Workspace Filtering
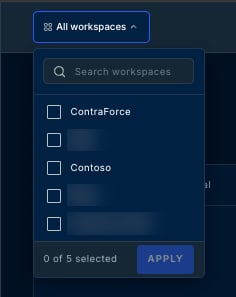
While seeing everything is powerful, sometimes you need to focus. The **Workspace Filter** lets you customize your view.
### How It Works
Click the workspace dropdown in the top navigation bar
Check the workspaces you want to display (one, several, or all)
All dashboard cards and tables update to show only selected workspaces
### What You Can See
| Function | Multi-Tenant Capability |
| ---------------------------- | ------------------------------------------------ |
| **Multi-Tenant Dropdown** | Filter down on one or many workspaces in seconds |
| **Closed Incident Trends** | Closed incidents trends across workspaces |
| **Incident Rule Trends** | Detections triggered by rules across workspaces |
| **Latest Gamebook Activity** | Recent response actions across workspaces |
### Default Behavior
By default, the Command Dashboard displays data for all onboarded workspaces. This gives you immediate visibility into your entire customer base without any configuration.
Start your day on the Command Dashboard to quickly identify which customers need attention. Trends and recent activity allow you to focus where it matters.
***
## Workspace Filtering
While seeing everything is powerful, sometimes you need to focus. The **Workspace Filter** lets you customize your view.
### How It Works
Click the workspace dropdown in the top navigation bar
Check the workspaces you want to display (one, several, or all)
All dashboard cards and tables update to show only selected workspaces
 ### Filter Persistence
Your workspace selection **persists as you navigate** between pages in ContraForce:
* Command Page → Incidents Page → Gamebooks Page
* Your selected workspaces remain active throughout your session
* No need to re-select filters on each page
This persistence is especially useful when you're focused on a specific customer's issues and need to investigate across multiple ContraForce features.
### Additional Filters
Beyond workspace filtering, you can further refine the Incidents table by:
| Filter | Options | Use Case |
| ------------ | -------------------------------- | ----------------------------- |
| **Severity** | High, Medium, Low, Informational | Prioritize critical incidents |
| **Status** | New, Active, Closed | Focus on open investigations |
| **Module** | Sentinel, Defender for Endpoint | Filter by security product |
***
## Multi-Tenant Incident Management
Managing incidents across tenants follows the same workflow—but with added context about which customer is affected.
### Incident Table Columns
The Incidents table includes workspace identification:
| Column | Description |
| ------------------ | --------------------------------------------- |
| **Severity** | Incident severity level |
| **Workspace** | Which customer/tenant the incident belongs to |
| **Incident Title** | Description of the incident |
| **Incident ID** | Unique identifier (click to investigate) |
| **Creation Time** | When the incident was detected |
| **Status** | Current investigation state |
| **Owner** | Assigned analyst |
### Incident Handling Across Tenants
You don't process cross-tenant incidents with a manual bulk action. **Security Delivery Agents** running **on queue** triage and act on incidents across all your tenants automatically as they arrive. See [Configuring Security Delivery Agents](/guides/getting-started/configuring-security-delivery-agents).
***
## Multi-Tenant Gamebook Activity
Track automated response actions across your entire customer base.
### Gamebook Activity Card
The Command Page shows **Latest Gamebook Activity** with:
* **Workspace** — Which customer the action was performed on
* **Status** — Success, Failed, Pending Approval
* **Incident** — Linked incident ID
* **Owner** — Who initiated the action
### Approval Workflows
When Gamebook actions require approval, you can manage all pending requests from one location:
1. Navigate to the **Gamebook Activity** tab
2. View pending approvals across all tenants
3. Approve or reject with full context
## Workspace Management
The **Workspaces Page** provides administrative control over your tenants.
### Pre-Onboarding
Prepare customer environments before full deployment:
* Create workspace placeholders
* Configure initial settings
* Streamline the onboarding process
### Post-Onboarding Management
After onboarding, manage workspace configurations:
* View onboarding status
* Access workspace settings
* Monitor integration health
Complete guide to the Workspace Manager.
***
## Best Practices for Multi-Tenant Operations
Use consistent workspace names that clearly identify customers. This makes filtering and incident triage faster.
Define which incident types require immediate attention vs. scheduled review. Use severity filtering to prioritize.
For large deployments, consider assigning analysts to specific workspace groups to build customer familiarity.
Start each day with a Command Page review across all tenants to catch emerging issues early.
Don't wait for incidents to reveal data flow problems. Check Data Connector Anomalies regularly.
***
## Related Guides
Deep dive into the central dashboard.
Complete incident workflow guide.
Manage tenant configurations.
Manage Users and Groups.
***
Questions about multi-tenant features? Contact us at [support@contraforce.com](mailto:support@contraforce.com).
### Filter Persistence
Your workspace selection **persists as you navigate** between pages in ContraForce:
* Command Page → Incidents Page → Gamebooks Page
* Your selected workspaces remain active throughout your session
* No need to re-select filters on each page
This persistence is especially useful when you're focused on a specific customer's issues and need to investigate across multiple ContraForce features.
### Additional Filters
Beyond workspace filtering, you can further refine the Incidents table by:
| Filter | Options | Use Case |
| ------------ | -------------------------------- | ----------------------------- |
| **Severity** | High, Medium, Low, Informational | Prioritize critical incidents |
| **Status** | New, Active, Closed | Focus on open investigations |
| **Module** | Sentinel, Defender for Endpoint | Filter by security product |
***
## Multi-Tenant Incident Management
Managing incidents across tenants follows the same workflow—but with added context about which customer is affected.
### Incident Table Columns
The Incidents table includes workspace identification:
| Column | Description |
| ------------------ | --------------------------------------------- |
| **Severity** | Incident severity level |
| **Workspace** | Which customer/tenant the incident belongs to |
| **Incident Title** | Description of the incident |
| **Incident ID** | Unique identifier (click to investigate) |
| **Creation Time** | When the incident was detected |
| **Status** | Current investigation state |
| **Owner** | Assigned analyst |
### Incident Handling Across Tenants
You don't process cross-tenant incidents with a manual bulk action. **Security Delivery Agents** running **on queue** triage and act on incidents across all your tenants automatically as they arrive. See [Configuring Security Delivery Agents](/guides/getting-started/configuring-security-delivery-agents).
***
## Multi-Tenant Gamebook Activity
Track automated response actions across your entire customer base.
### Gamebook Activity Card
The Command Page shows **Latest Gamebook Activity** with:
* **Workspace** — Which customer the action was performed on
* **Status** — Success, Failed, Pending Approval
* **Incident** — Linked incident ID
* **Owner** — Who initiated the action
### Approval Workflows
When Gamebook actions require approval, you can manage all pending requests from one location:
1. Navigate to the **Gamebook Activity** tab
2. View pending approvals across all tenants
3. Approve or reject with full context
## Workspace Management
The **Workspaces Page** provides administrative control over your tenants.
### Pre-Onboarding
Prepare customer environments before full deployment:
* Create workspace placeholders
* Configure initial settings
* Streamline the onboarding process
### Post-Onboarding Management
After onboarding, manage workspace configurations:
* View onboarding status
* Access workspace settings
* Monitor integration health
Complete guide to the Workspace Manager.
***
## Best Practices for Multi-Tenant Operations
Use consistent workspace names that clearly identify customers. This makes filtering and incident triage faster.
Define which incident types require immediate attention vs. scheduled review. Use severity filtering to prioritize.
For large deployments, consider assigning analysts to specific workspace groups to build customer familiarity.
Start each day with a Command Page review across all tenants to catch emerging issues early.
Don't wait for incidents to reveal data flow problems. Check Data Connector Anomalies regularly.
***
## Related Guides
Deep dive into the central dashboard.
Complete incident workflow guide.
Manage tenant configurations.
Manage Users and Groups.
***
Questions about multi-tenant features? Contact us at [support@contraforce.com](mailto:support@contraforce.com).