> ## Documentation Index
> Fetch the complete documentation index at: https://docs.contraforce.com/llms.txt
> Use this file to discover all available pages before exploring further.
# Workbench Overview
> Create custom incident response workflows with AI-mapped playbooks and one-click actions. Visualize entities, build Gamebooks, and resolve incidents faster.
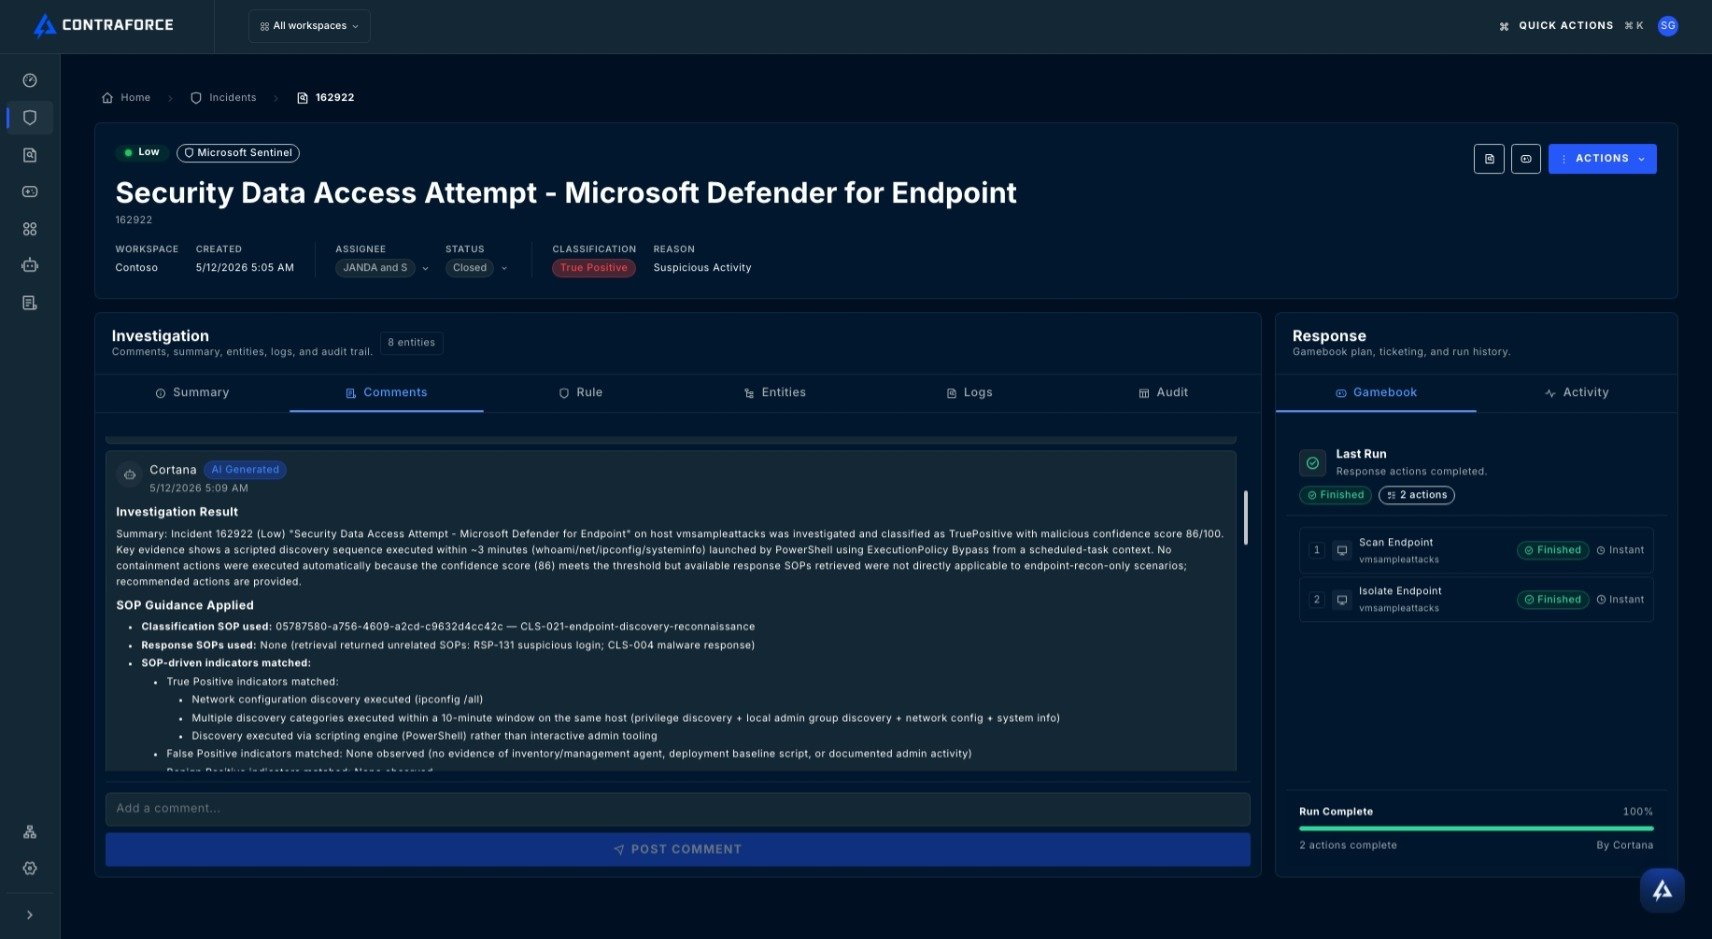
The Security Workbench is your investigation and response command center. Visualize affected entities, build custom response workflows, and execute remediation actions—all from a single interface.
 ## What is the Workbench?
The Workbench combines investigation and response into one powerful experience:
Automatically recommended response actions based on affected entity types
See all related entities in an interactive context graph
Click-through investigation for entities without writing queries
Chain multiple actions into comprehensive Gamebooks
The Workbench is where investigation meets action. Instead of switching between tools, you can analyze the threat and respond to it in the same place.
***
## Accessing the Workbench
From the Command Page, click any **Incident ID** in the Incidents table
The Incident Summary opens with overview information
Click the dropdown next to **Edit** and select **Create New Gamebook**
***
## Workbench Layout
The Security Workbench is organized into several key areas:
### Incident Header
At the top of the Workbench, you'll find:
| Element | Description |
| ------------------ | --------------------------------------------------- |
| **Incident Title** | Name and ID of the incident |
| **Status** | Current state (New, Active, Closed)—editable inline |
| **Owner** | Assigned analyst—editable inline |
| **Severity** | Incident severity level |
You can update the Status and Owner directly from the Workbench without leaving the page.
### Entity Graph
The central visualization showing all entities involved in the incident:
* **Users** — Accounts that were affected or involved
* **Devices** — Endpoints implicated in the incident
* **IPs** — Network addresses related to the activity
* **Files** — Suspicious files or hashes detected
* **URLs/Domains** — Web resources involved
Click any entity icon to:
* View entity details
* See other incidents involving this entity
* Access available response actions
### Tabs
Overview of the incident including description, timeline summary, and key indicators.
Detailed list of all affected entities with expandable details and cross-incident correlation.
Team collaboration space. Add investigation notes and view comments from other analysts.
Complete audit trail of all actions taken on this incident, including previously run Gamebooks.
***
## Building a Gamebook
Gamebooks are response workflows you build or agents can build by selecting response actions for each affected entity.
### Step 1: Select an Entity
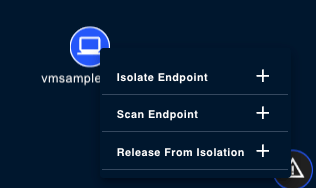
Left-click an entity icon in the Entity Context Graph. The response actions appear already mapped to the entity type selected.
## What is the Workbench?
The Workbench combines investigation and response into one powerful experience:
Automatically recommended response actions based on affected entity types
See all related entities in an interactive context graph
Click-through investigation for entities without writing queries
Chain multiple actions into comprehensive Gamebooks
The Workbench is where investigation meets action. Instead of switching between tools, you can analyze the threat and respond to it in the same place.
***
## Accessing the Workbench
From the Command Page, click any **Incident ID** in the Incidents table
The Incident Summary opens with overview information
Click the dropdown next to **Edit** and select **Create New Gamebook**
***
## Workbench Layout
The Security Workbench is organized into several key areas:
### Incident Header
At the top of the Workbench, you'll find:
| Element | Description |
| ------------------ | --------------------------------------------------- |
| **Incident Title** | Name and ID of the incident |
| **Status** | Current state (New, Active, Closed)—editable inline |
| **Owner** | Assigned analyst—editable inline |
| **Severity** | Incident severity level |
You can update the Status and Owner directly from the Workbench without leaving the page.
### Entity Graph
The central visualization showing all entities involved in the incident:
* **Users** — Accounts that were affected or involved
* **Devices** — Endpoints implicated in the incident
* **IPs** — Network addresses related to the activity
* **Files** — Suspicious files or hashes detected
* **URLs/Domains** — Web resources involved
Click any entity icon to:
* View entity details
* See other incidents involving this entity
* Access available response actions
### Tabs
Overview of the incident including description, timeline summary, and key indicators.
Detailed list of all affected entities with expandable details and cross-incident correlation.
Team collaboration space. Add investigation notes and view comments from other analysts.
Complete audit trail of all actions taken on this incident, including previously run Gamebooks.
***
## Building a Gamebook
Gamebooks are response workflows you build or agents can build by selecting response actions for each affected entity.
### Step 1: Select an Entity
Left-click an entity icon in the Entity Context Graph. The response actions appear already mapped to the entity type selected.
 ### Step 2: Browse Available Actions
By left-clicking entities, you will be able to utilize the following response actions:
| Entity Type | Response Actions |
| ----------- | ---------------------------------------------------------------------------------- |
| **User** | Invalidate sessions, lockout user, reset user password, reset MFA, and unlock user |
| **Device** | Isolate device, run AV scan, unisolate device |
| **IP** | Block Azure Network Security Group (NSG) |
| **File** | Quarantine file, block hash |
Available actions depend on the entity type and your connected modules. Gamebook response actions automatically map to actions that are relevant and executable.
### Step 3: Add Actions to Gamebook
* Click the **+ icon** to add a response action to your Gamebook
* Hover over the action in the Gamebook and the **red - icon** will remove a response action
* Repeat for each entity you want to take action on
### Step 2: Browse Available Actions
By left-clicking entities, you will be able to utilize the following response actions:
| Entity Type | Response Actions |
| ----------- | ---------------------------------------------------------------------------------- |
| **User** | Invalidate sessions, lockout user, reset user password, reset MFA, and unlock user |
| **Device** | Isolate device, run AV scan, unisolate device |
| **IP** | Block Azure Network Security Group (NSG) |
| **File** | Quarantine file, block hash |
Available actions depend on the entity type and your connected modules. Gamebook response actions automatically map to actions that are relevant and executable.
### Step 3: Add Actions to Gamebook
* Click the **+ icon** to add a response action to your Gamebook
* Hover over the action in the Gamebook and the **red - icon** will remove a response action
* Repeat for each entity you want to take action on
 ### Step 4: Review Your Gamebook
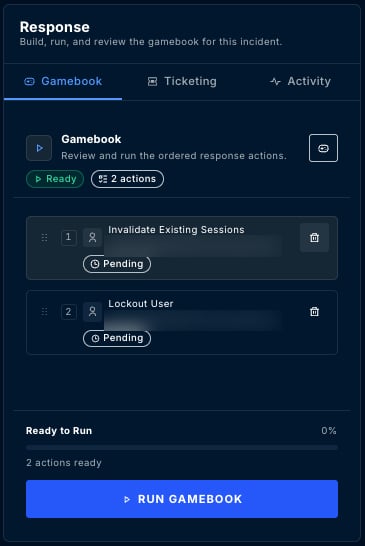
As you add actions, they load in the **Gamebook card**.
### Step 5: Execute the Gamebook
Verify all actions in the Gamebook are correct
Execute all actions in the Gamebook
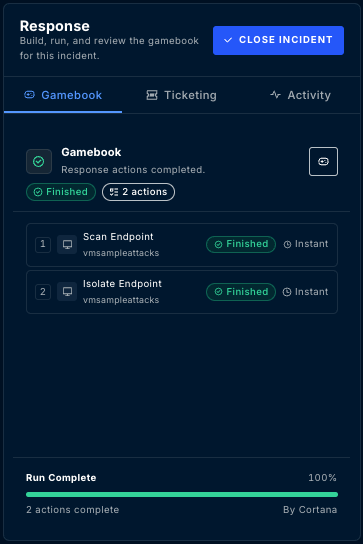
Status updates from "Pending" to "Running" to "Finished"
### Step 4: Review Your Gamebook
As you add actions, they load in the **Gamebook card**.
### Step 5: Execute the Gamebook
Verify all actions in the Gamebook are correct
Execute all actions in the Gamebook
Status updates from "Pending" to "Running" to "Finished"
 ***
## Gamebook Approval Workflow
Some Gamebooks require approval before execution, indicated by a \*\*Approve \*\*button in the Gamebooks page or in the Gamebook within the Workbench.
Actions with approval requirements are typically high-impact operations like device isolation or reset user password. This prevents accidental execution.
### Requesting Approval
1. Build your Gamebook as usual (including locked actions)
2. Click **Request Gamebook Approval** instead of Run Gamebook
3. The request is sent to users with approval permissions
### Approving Gamebooks
Approvers can approve requests from:
* **The incident itself** — Open the incident and approve directly
* **Gamebook Activity tab** — Review all pending approvals in one place
***
## Gamebook Approval Workflow
Some Gamebooks require approval before execution, indicated by a \*\*Approve \*\*button in the Gamebooks page or in the Gamebook within the Workbench.
Actions with approval requirements are typically high-impact operations like device isolation or reset user password. This prevents accidental execution.
### Requesting Approval
1. Build your Gamebook as usual (including locked actions)
2. Click **Request Gamebook Approval** instead of Run Gamebook
3. The request is sent to users with approval permissions
### Approving Gamebooks
Approvers can approve requests from:
* **The incident itself** — Open the incident and approve directly
* **Gamebook Activity tab** — Review all pending approvals in one place
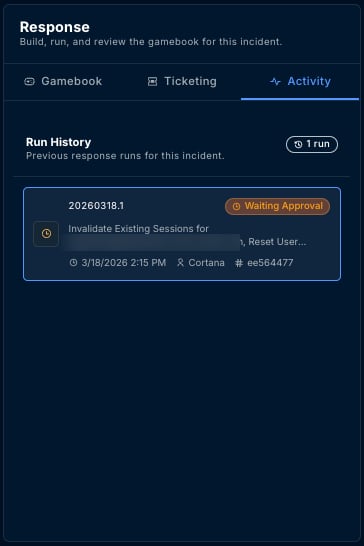 * **Gamebook Activity page** — Review all pending approvals in one place
 Loading previous Gamebooks is especially useful for recurring incident types. Build a response once, reuse it across similar incidents.
## Gamebook Activity Page
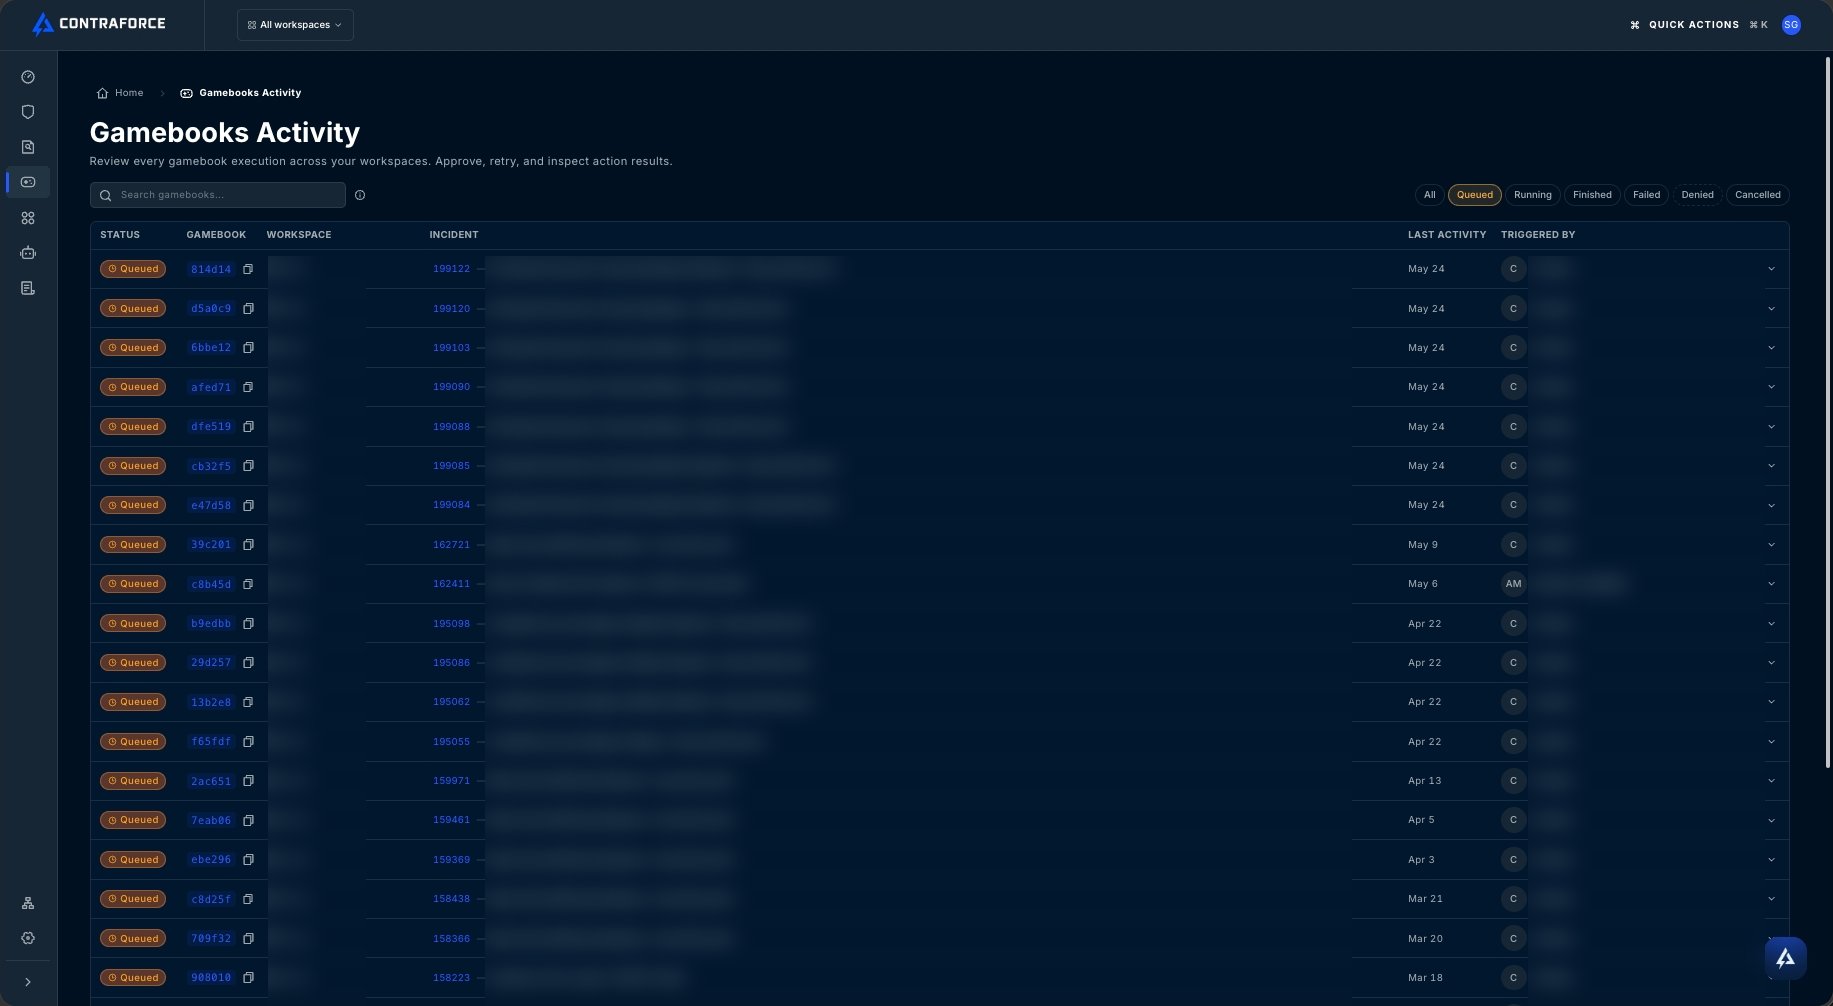
Track all Gamebooks in one queue across your every workspace from the dedicated **Gamebooks Page**.
### What You Can See
| Column | Description |
| --------------- | ------------------------------------ |
| **Status** | Success, Failed, Pending Approval |
| **Incident** | Linked incident ID |
| **Actions** | What actions were performed |
| **Time to Run** | Execution duration |
| **Workspace** | Which tenant the actions ran against |
### Expanding Details
Click any row to expand and see:
* Individual action results
* Error messages (if any failed)
* Timestamps for each step
* Entity details
## Best Practices
Focus your initial response on the most critical entities—compromised users, infected devices, or malicious IPs that pose immediate risk.
Add comments as you investigate. This creates a record for your team and helps with post-incident review.
Always review the complete Gamebook Card before clicking Run. Verify you're taking action on the correct entities.
Before building a new Gamebook, check the History tab. A previous response may already exist that you can reuse or adapt.
Regularly check the Gamebook Activity page to ensure actions completed successfully and catch any failures early.
***
## Related Guides
Deep dive into Gamebook capabilities.
Complete incident workflows.
Available entity enrichment data.
Classify incidents after resolution.
***
Need help with the Security Workbench? Contact us at [support@contraforce.com](mailto:support@contraforce.com)
Loading previous Gamebooks is especially useful for recurring incident types. Build a response once, reuse it across similar incidents.
## Gamebook Activity Page
Track all Gamebooks in one queue across your every workspace from the dedicated **Gamebooks Page**.
### What You Can See
| Column | Description |
| --------------- | ------------------------------------ |
| **Status** | Success, Failed, Pending Approval |
| **Incident** | Linked incident ID |
| **Actions** | What actions were performed |
| **Time to Run** | Execution duration |
| **Workspace** | Which tenant the actions ran against |
### Expanding Details
Click any row to expand and see:
* Individual action results
* Error messages (if any failed)
* Timestamps for each step
* Entity details
## Best Practices
Focus your initial response on the most critical entities—compromised users, infected devices, or malicious IPs that pose immediate risk.
Add comments as you investigate. This creates a record for your team and helps with post-incident review.
Always review the complete Gamebook Card before clicking Run. Verify you're taking action on the correct entities.
Before building a new Gamebook, check the History tab. A previous response may already exist that you can reuse or adapt.
Regularly check the Gamebook Activity page to ensure actions completed successfully and catch any failures early.
***
## Related Guides
Deep dive into Gamebook capabilities.
Complete incident workflows.
Available entity enrichment data.
Classify incidents after resolution.
***
Need help with the Security Workbench? Contact us at [support@contraforce.com](mailto:support@contraforce.com)