> ## Documentation Index
> Fetch the complete documentation index at: https://docs.contraforce.com/llms.txt
> Use this file to discover all available pages before exploring further.
# User & Group Management for Partners
> Comprehensive guide for MSP/MSSP partners to understand and configure user management, groups, and permissions across parent and child workspaces.
This guide addresses the most common challenges MSP/MSSP partners face when setting up user and group management in ContraForce. Understanding the relationship between parent (partner) and child (customer) workspaces is essential for a smooth onboarding experience.
## **Recommended Default Groups**
Setting up default groups during initial configuration saves time and ensures consistent access patterns.
**Suggested Partner Groups**
| Group Name | Description | Suggested Workspace Role |
| :-------------------- | :------------------------------------------ | :--------------------------- |
| SOC Tier 1 | Front-line analysts handling initial triage | Incident Analyst |
| SOC Tier 2 | Senior analysts with response capabilities | Incident Responder |
| SOC Managers | Team leads overseeing operations | Admin |
| Integration Engineers | Technical staff managing connectors | Data Source Admin |
| Account Managers | Customer relationship managers | Incident Analyst (read-only) |
> ## For Azure Administrators
>
> For MSP/MSSP teams already fluent in Azure and Entra administration, ContraForce's user and group management model will feel intuitive once you establish these mental mappings:
>
> 1. Organization = Root Management Group: The top-level scope where you establish identities that can flow down
> 2. Workspace = Subscription / Administrative Unit: The isolation boundary where customer-specific access lives
> 3. Organization Groups = Inherited RBAC: Create once, assign many times, automatic access when group membership changes
> 4. Workspace Users = AU-scoped delegation: Strictly bounded to one customer's data
> 5. Two locations = Two scopes: Just like Azure has IAM blades at different levels, ContraForce has Organization Settings and Workspace Settings
>
> The key transferable skill is **thinking hierarchically about access scope**—a discipline your team has already developed managing Azure governance at scale.
This guide is specifically designed for **MSP/MSSP partners** managing multiple customer workspaces. If you're a single-tenant customer, see the standard [User Management](/guides/general-support/user-management) guide.
## Understanding the Two-Tier Model
ContraForce uses a two-tier user management model that separates partner-level access from customer-level access. This is the **most important concept** to understand before configuring users and groups.
Your organization's workspace where you manage your team and oversee all customer workspaces
Individual customer workspaces where you manage customer-specific users and access
### How the Tiers Work Together
```mermaid theme={null}
flowchart TD
A[Partner Organization] --> B[Partner Workspace]
B --> C[Partner Users & Groups]
B --> D[Customer Workspace 1]
B --> E[Customer Workspace 2]
B --> F[Customer Workspace 3]
D --> G[Customer 1 Users & Groups]
E --> H[Customer 2 Users & Groups]
F --> I[Customer 3 Users & Groups]
C --> D
C --> E
C --> F
```
**Key Insight:** Users and groups created at the **child (customer) level** are only visible within that specific workspace. Users and groups created at the **parent (partner) level** can be assigned access across ALL workspaces.
***
## The Two Places for User & Group Management
One of the most common points of confusion is that there are **two different locations** to manage users and groups, each serving a different purpose.
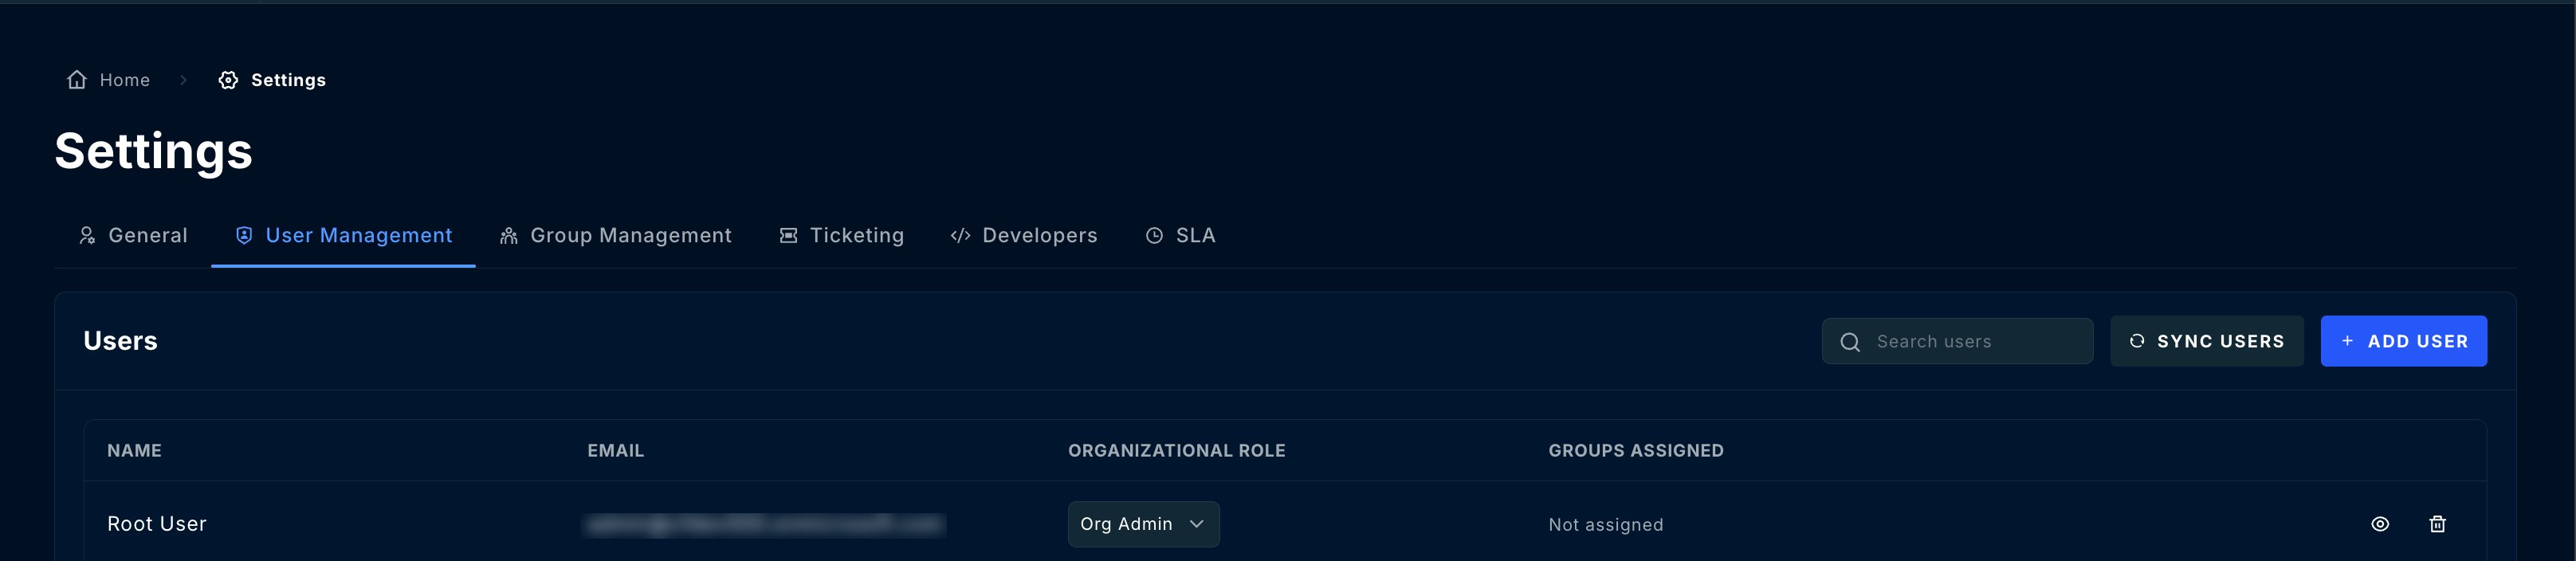
### Location 1: Organization Settings (Partner Level)
**Path:** Settings → User Management
This is where you manage users and groups for your **partner organization**:
| What You Manage | Scope |
| -------------------- | --------------------------- |
| Partner team members | Access to all workspaces |
| Partner user groups | Cross-workspace permissions |
| Organizational roles | Partner-level capabilities |
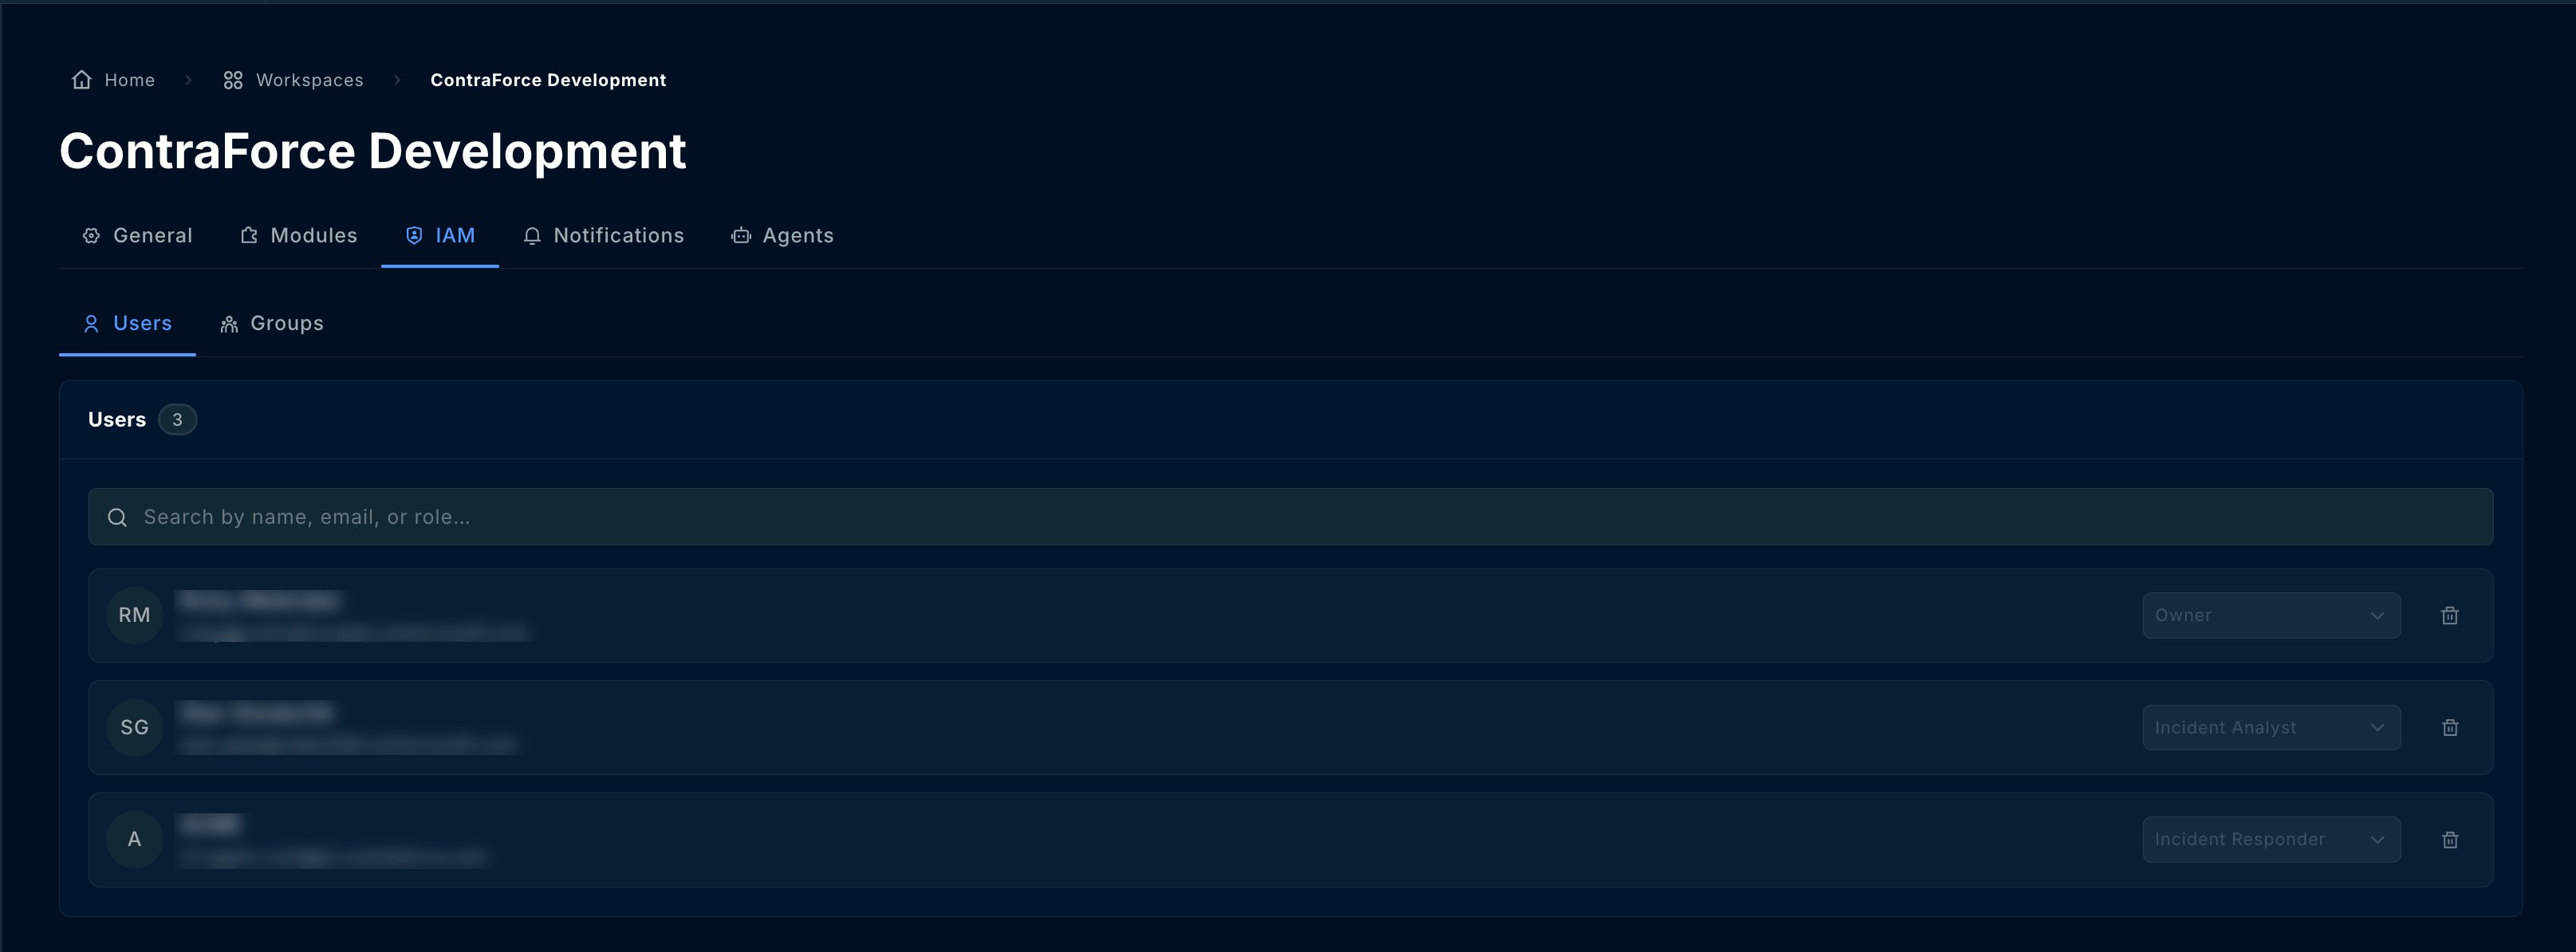
 ### Location 2: Workspace Settings (Customer Level)
**Path:** Workspaces → \[Select Customer] → IAM → Users & Groups
This is where you manage users and groups for a **specific customer workspace**:
| What You Manage | Scope |
| ------------------------ | ------------------- |
| Customer users | This workspace only |
| Customer groups | This workspace only |
| Workspace-specific roles | This workspace only |
### Location 2: Workspace Settings (Customer Level)
**Path:** Workspaces → \[Select Customer] → IAM → Users & Groups
This is where you manage users and groups for a **specific customer workspace**:
| What You Manage | Scope |
| ------------------------ | ------------------- |
| Customer users | This workspace only |
| Customer groups | This workspace only |
| Workspace-specific roles | This workspace only |
 ### Quick Reference: Where to Go
| I Want To... | Go To |
| ------------------------------------------------------------ | --------------------- |
| Add a partner analyst who needs access to multiple customers | Organization Settings |
| Create a group for your SOC team to access all workspaces | Organization Settings |
| Add a customer's IT admin to view their own workspace | Workspace Settings |
| Create a customer-specific group | Workspace Settings |
| Manage your own organization's users | Organization Settings |
| Grant a customer limited access to their incidents | Workspace Settings |
***
## Parent vs Child: When to Use Each
### Use Parent (Organization) Level When:
Your internal team needs access to multiple or all customer workspaces. Adding them at the organization level lets you assign them to any workspace without recreating their account.
**Example:** Adding a new SOC analyst who will handle incidents for 10 customers.
Create groups like "Tier 1 Analysts," "Tier 2 Engineers," or "Account Managers" at the organization level, then assign these groups to relevant workspaces.
**Example:** Create a "SOC Team" group, add your analysts, then assign this group to all customer workspaces.
When you need consistent permissions across multiple customers, define them at the organization level.
**Example:** All Tier 1 analysts should have "Incident Responder" role across all customer workspaces.
### Use Child (Workspace) Level When:
Customers who need to view their own incidents, reports, or dashboards should be added at the workspace level.
**Example:** Adding a customer's CISO who wants to review their security incidents.
Groups that only make sense for a specific customer should be created at the workspace level.
**Example:** A customer's "Security Committee" group that reviews monthly reports.
When customers need read-only or limited access to their workspace.
**Example:** A customer's compliance officer who needs incident audit access.
***
## Step-by-Step: Setting Up Partner Users
### Adding a Partner Team Member
Go to **Settings** → **User Management**
Click the **Add User** button
Enter the user's email address (must match their Microsoft Entra ID account)
Select the appropriate organization-level role:
* **Organization Admin** — Full platform access
* **Organization Member** — Standard access
Click **Save** to create the user
Assign the user to specific customer workspaces (see next section)
### Assigning Users to Customer Workspaces
After creating a user at the organization level, grant them access to customer workspaces:
Navigate to the **Workspaces** page
Click on the customer workspace you want to configure
Click the workspace card to open its settings page
Select the **Users & Groups** tab
Add the organization user or group to this workspace
Select the role for this specific workspace:
* **Admin** — Full workspace control
* **Incident Responder** — Investigate and respond
* **Incident Analyst** — View and analyze
* **Data Source Admin** — Manage integrations
***
## Step-by-Step: Setting Up Groups
Groups simplify permission management by letting you assign roles to multiple users at once.
### Creating an Organization Group
Go to **Settings** → **User Management** → **Groups** tab
Click **Create Group**
Enter a descriptive name (e.g., "SOC Tier 1 Analysts")
Select users to add to this group
Click **Save** to create the group
### Assigning a Group to Workspaces
Navigate to the customer workspace → **IAM** → **Users & Groups**
Click **Add Group**
Choose the group from your organization
Select the workspace role for all group members
Click **Save** to apply
**Best Practice:** Create groups at the organization level and assign them to workspaces. This way, when you add a new team member to a group, they automatically get access to all workspaces that group is assigned to.
***
## Recommended Default Groups
Setting up default groups during initial configuration saves time and ensures consistent access patterns.
### Suggested Partner Groups
| Group Name | Description | Suggested Workspace Role |
| ------------------------- | ------------------------------------------- | ---------------------------- |
| **SOC Tier 1** | Front-line analysts handling initial triage | Incident Analyst |
| **SOC Tier 2** | Senior analysts with response capabilities | Incident Responder |
| **SOC Managers** | Team leads overseeing operations | Admin |
| **Integration Engineers** | Technical staff managing connectors | Data Source Admin |
| **Account Managers** | Customer relationship managers | Incident Analyst (read-only) |
### Setting Up Default Groups
Before onboarding customers, create your standard groups at the organization level
Add your team members to the appropriate groups
Document what each group is for and what role it should receive
When onboarding new customers, assign these groups with consistent roles
**Pro Tip:** Create a simple spreadsheet mapping your groups to workspace roles. This becomes your "template" for onboarding new customers and ensures consistency.
***
## Common Permission Scenarios
### Scenario 1: New SOC Analyst Joining Your Team
**Goal:** Add a new analyst who needs to handle incidents for all customers.
Settings → User Management → Add User → Enter email → Save
Add user to your "SOC Tier 1" or appropriate group
The user automatically inherits access to all workspaces the group is assigned to
### Scenario 2: Customer Wants to View Their Incidents
**Goal:** Give a customer's security team read-only access to their workspace.
Workspaces → Select Customer → IAM
Users & Groups → Add User → Enter customer email
Select "Incident Analyst" role for read-only access
### Scenario 3: Partner User Can't Access a Workspace
**Goal:** Troubleshoot why a partner user can't see a specific customer workspace.
Verify the user exists in Settings → User Management
Verify the user is in a group that has workspace access
Go to the workspace settings and verify the user or their group is listed
Ensure a workspace role is assigned (not just added to the workspace)
### Scenario 4: User Has Wrong Permissions
**Goal:** User can view incidents but can't respond to them.
**Cause:** User has "Incident Analyst" role instead of "Incident Responder."
Navigate to the affected workspace
Locate in Users & Groups
Change role from Incident Analyst to Incident Responder
Click Save to apply
***
## Workspace Roles Reference
| Role | View Incidents | Respond to Incidents | Manage Gamebooks | Configure Modules | Manage Users |
| ---------------------- | :------------: | :------------------: | :--------------: | :---------------: | :----------: |
| **Admin** | ✓ | ✓ | ✓ | ✓ | ✓ |
| **Incident Responder** | ✓ | ✓ | ✓ | — | — |
| **Incident Analyst** | ✓ | — | — | — | — |
| **Data Source Admin** | ✓ | — | — | ✓ | — |
| **Content Admin** | ✓ | — | — | CMS Only | — |
View complete permissions for all roles
***
## Troubleshooting
### Common Issues
| Issue | Cause | Solution |
| ------------------------------------------------ | ----------------------------- | -------------------------------------------------- |
| **User can't see any workspaces** | Not assigned to any workspace | Add user/group to workspaces in workspace settings |
| **User can see workspace but can't do anything** | No role assigned | Assign a workspace role to the user or their group |
| **User can't add modules** | Insufficient role | User needs Admin or Data Source Admin role |
| **Can't add users to workspace** | Not a workspace Admin | Need Admin role on that workspace |
| **Group changes not reflected** | Caching | Refresh browser; changes may take a few minutes |
| **Customer user sees other customers' data** | Added at wrong level | Remove from org level, add only at workspace level |
### Permission Troubleshooting Flow
```mermaid theme={null}
flowchart TD
A[User Can't Access Something] --> B{Is user in Organization?}
B -->|No| C[Add user to Organization]
B -->|Yes| D{Is user assigned to Workspace?}
D -->|No| E[Add user/group to Workspace]
D -->|Yes| F{Does user have correct Role?}
F -->|No| G[Update workspace role]
F -->|Yes| H[Check module-specific permissions]
C --> D
E --> F
G --> I[Issue Resolved]
H --> I
```
***
## Best Practices
Set up your standard groups (SOC Tier 1, Tier 2, Managers, etc.) before onboarding any customers. This creates a consistent template to follow.
Assigning groups to workspaces instead of individual users makes it much easier to onboard new team members—just add them to the appropriate group.
Create a simple reference document showing which groups get which roles. This ensures consistency across all customer onboardings.
Never add customer users at the organization level unless they need cross-workspace access. This prevents accidental data exposure.
Name groups clearly (e.g., "SOC-Tier1-Analysts" not "Group1") so anyone can understand their purpose.
Review user and group assignments quarterly to remove departed employees and ensure permissions are still appropriate.
After setting up permissions, test access with a non-admin account to verify users see what they should see.
***
## Onboarding Checklist
Use this checklist when onboarding a new customer workspace:
### Pre-Onboarding (One-Time Setup)
* Create standard organization groups (SOC Tier 1, Tier 2, etc.)
* Add your team members to appropriate groups
* Document group-to-role mappings
### Per-Customer Onboarding
* Create/configure customer workspace
* Assign organization groups to workspace with appropriate roles
* Verify partner team can access the workspace
* Add customer users at workspace level (if needed)
* Create customer-specific groups (if needed)
* Test access with a non-admin account
* Document any customer-specific permission requirements
***
## Frequently Asked Questions
The two locations serve different purposes: Organization Settings manages your partner team (who may need access to multiple customers), while Workspace Settings manages access to a specific customer (including customer users who should only see their own data).
Not if set up correctly. Customer users should only be added at the workspace level, not at the organization level. This ensures they can only see their own workspace.
Add them to an organization group that's already assigned to all customer workspaces. They'll inherit access automatically.
Yes. A user might be an Admin in one workspace and an Incident Responder in another. Roles are assigned per-workspace.
They lose access to all workspaces that group was assigned to (unless they have individual access or belong to another group with access).
Yes, if you give them the Admin role on their workspace. They can then add/remove users within their workspace only.
***
## Related Guides
Complete permissions for each role
Managing customer workspaces
Full onboarding process
Cross-workspace management
***
Questions about user and group management? Contact us at [support@contraforce.com](mailto:support@contraforce.com) or request hands-on onboarding support for your first few customer deployments.
### Quick Reference: Where to Go
| I Want To... | Go To |
| ------------------------------------------------------------ | --------------------- |
| Add a partner analyst who needs access to multiple customers | Organization Settings |
| Create a group for your SOC team to access all workspaces | Organization Settings |
| Add a customer's IT admin to view their own workspace | Workspace Settings |
| Create a customer-specific group | Workspace Settings |
| Manage your own organization's users | Organization Settings |
| Grant a customer limited access to their incidents | Workspace Settings |
***
## Parent vs Child: When to Use Each
### Use Parent (Organization) Level When:
Your internal team needs access to multiple or all customer workspaces. Adding them at the organization level lets you assign them to any workspace without recreating their account.
**Example:** Adding a new SOC analyst who will handle incidents for 10 customers.
Create groups like "Tier 1 Analysts," "Tier 2 Engineers," or "Account Managers" at the organization level, then assign these groups to relevant workspaces.
**Example:** Create a "SOC Team" group, add your analysts, then assign this group to all customer workspaces.
When you need consistent permissions across multiple customers, define them at the organization level.
**Example:** All Tier 1 analysts should have "Incident Responder" role across all customer workspaces.
### Use Child (Workspace) Level When:
Customers who need to view their own incidents, reports, or dashboards should be added at the workspace level.
**Example:** Adding a customer's CISO who wants to review their security incidents.
Groups that only make sense for a specific customer should be created at the workspace level.
**Example:** A customer's "Security Committee" group that reviews monthly reports.
When customers need read-only or limited access to their workspace.
**Example:** A customer's compliance officer who needs incident audit access.
***
## Step-by-Step: Setting Up Partner Users
### Adding a Partner Team Member
Go to **Settings** → **User Management**
Click the **Add User** button
Enter the user's email address (must match their Microsoft Entra ID account)
Select the appropriate organization-level role:
* **Organization Admin** — Full platform access
* **Organization Member** — Standard access
Click **Save** to create the user
Assign the user to specific customer workspaces (see next section)
### Assigning Users to Customer Workspaces
After creating a user at the organization level, grant them access to customer workspaces:
Navigate to the **Workspaces** page
Click on the customer workspace you want to configure
Click the workspace card to open its settings page
Select the **Users & Groups** tab
Add the organization user or group to this workspace
Select the role for this specific workspace:
* **Admin** — Full workspace control
* **Incident Responder** — Investigate and respond
* **Incident Analyst** — View and analyze
* **Data Source Admin** — Manage integrations
***
## Step-by-Step: Setting Up Groups
Groups simplify permission management by letting you assign roles to multiple users at once.
### Creating an Organization Group
Go to **Settings** → **User Management** → **Groups** tab
Click **Create Group**
Enter a descriptive name (e.g., "SOC Tier 1 Analysts")
Select users to add to this group
Click **Save** to create the group
### Assigning a Group to Workspaces
Navigate to the customer workspace → **IAM** → **Users & Groups**
Click **Add Group**
Choose the group from your organization
Select the workspace role for all group members
Click **Save** to apply
**Best Practice:** Create groups at the organization level and assign them to workspaces. This way, when you add a new team member to a group, they automatically get access to all workspaces that group is assigned to.
***
## Recommended Default Groups
Setting up default groups during initial configuration saves time and ensures consistent access patterns.
### Suggested Partner Groups
| Group Name | Description | Suggested Workspace Role |
| ------------------------- | ------------------------------------------- | ---------------------------- |
| **SOC Tier 1** | Front-line analysts handling initial triage | Incident Analyst |
| **SOC Tier 2** | Senior analysts with response capabilities | Incident Responder |
| **SOC Managers** | Team leads overseeing operations | Admin |
| **Integration Engineers** | Technical staff managing connectors | Data Source Admin |
| **Account Managers** | Customer relationship managers | Incident Analyst (read-only) |
### Setting Up Default Groups
Before onboarding customers, create your standard groups at the organization level
Add your team members to the appropriate groups
Document what each group is for and what role it should receive
When onboarding new customers, assign these groups with consistent roles
**Pro Tip:** Create a simple spreadsheet mapping your groups to workspace roles. This becomes your "template" for onboarding new customers and ensures consistency.
***
## Common Permission Scenarios
### Scenario 1: New SOC Analyst Joining Your Team
**Goal:** Add a new analyst who needs to handle incidents for all customers.
Settings → User Management → Add User → Enter email → Save
Add user to your "SOC Tier 1" or appropriate group
The user automatically inherits access to all workspaces the group is assigned to
### Scenario 2: Customer Wants to View Their Incidents
**Goal:** Give a customer's security team read-only access to their workspace.
Workspaces → Select Customer → IAM
Users & Groups → Add User → Enter customer email
Select "Incident Analyst" role for read-only access
### Scenario 3: Partner User Can't Access a Workspace
**Goal:** Troubleshoot why a partner user can't see a specific customer workspace.
Verify the user exists in Settings → User Management
Verify the user is in a group that has workspace access
Go to the workspace settings and verify the user or their group is listed
Ensure a workspace role is assigned (not just added to the workspace)
### Scenario 4: User Has Wrong Permissions
**Goal:** User can view incidents but can't respond to them.
**Cause:** User has "Incident Analyst" role instead of "Incident Responder."
Navigate to the affected workspace
Locate in Users & Groups
Change role from Incident Analyst to Incident Responder
Click Save to apply
***
## Workspace Roles Reference
| Role | View Incidents | Respond to Incidents | Manage Gamebooks | Configure Modules | Manage Users |
| ---------------------- | :------------: | :------------------: | :--------------: | :---------------: | :----------: |
| **Admin** | ✓ | ✓ | ✓ | ✓ | ✓ |
| **Incident Responder** | ✓ | ✓ | ✓ | — | — |
| **Incident Analyst** | ✓ | — | — | — | — |
| **Data Source Admin** | ✓ | — | — | ✓ | — |
| **Content Admin** | ✓ | — | — | CMS Only | — |
View complete permissions for all roles
***
## Troubleshooting
### Common Issues
| Issue | Cause | Solution |
| ------------------------------------------------ | ----------------------------- | -------------------------------------------------- |
| **User can't see any workspaces** | Not assigned to any workspace | Add user/group to workspaces in workspace settings |
| **User can see workspace but can't do anything** | No role assigned | Assign a workspace role to the user or their group |
| **User can't add modules** | Insufficient role | User needs Admin or Data Source Admin role |
| **Can't add users to workspace** | Not a workspace Admin | Need Admin role on that workspace |
| **Group changes not reflected** | Caching | Refresh browser; changes may take a few minutes |
| **Customer user sees other customers' data** | Added at wrong level | Remove from org level, add only at workspace level |
### Permission Troubleshooting Flow
```mermaid theme={null}
flowchart TD
A[User Can't Access Something] --> B{Is user in Organization?}
B -->|No| C[Add user to Organization]
B -->|Yes| D{Is user assigned to Workspace?}
D -->|No| E[Add user/group to Workspace]
D -->|Yes| F{Does user have correct Role?}
F -->|No| G[Update workspace role]
F -->|Yes| H[Check module-specific permissions]
C --> D
E --> F
G --> I[Issue Resolved]
H --> I
```
***
## Best Practices
Set up your standard groups (SOC Tier 1, Tier 2, Managers, etc.) before onboarding any customers. This creates a consistent template to follow.
Assigning groups to workspaces instead of individual users makes it much easier to onboard new team members—just add them to the appropriate group.
Create a simple reference document showing which groups get which roles. This ensures consistency across all customer onboardings.
Never add customer users at the organization level unless they need cross-workspace access. This prevents accidental data exposure.
Name groups clearly (e.g., "SOC-Tier1-Analysts" not "Group1") so anyone can understand their purpose.
Review user and group assignments quarterly to remove departed employees and ensure permissions are still appropriate.
After setting up permissions, test access with a non-admin account to verify users see what they should see.
***
## Onboarding Checklist
Use this checklist when onboarding a new customer workspace:
### Pre-Onboarding (One-Time Setup)
* Create standard organization groups (SOC Tier 1, Tier 2, etc.)
* Add your team members to appropriate groups
* Document group-to-role mappings
### Per-Customer Onboarding
* Create/configure customer workspace
* Assign organization groups to workspace with appropriate roles
* Verify partner team can access the workspace
* Add customer users at workspace level (if needed)
* Create customer-specific groups (if needed)
* Test access with a non-admin account
* Document any customer-specific permission requirements
***
## Frequently Asked Questions
The two locations serve different purposes: Organization Settings manages your partner team (who may need access to multiple customers), while Workspace Settings manages access to a specific customer (including customer users who should only see their own data).
Not if set up correctly. Customer users should only be added at the workspace level, not at the organization level. This ensures they can only see their own workspace.
Add them to an organization group that's already assigned to all customer workspaces. They'll inherit access automatically.
Yes. A user might be an Admin in one workspace and an Incident Responder in another. Roles are assigned per-workspace.
They lose access to all workspaces that group was assigned to (unless they have individual access or belong to another group with access).
Yes, if you give them the Admin role on their workspace. They can then add/remove users within their workspace only.
***
## Related Guides
Complete permissions for each role
Managing customer workspaces
Full onboarding process
Cross-workspace management
***
Questions about user and group management? Contact us at [support@contraforce.com](mailto:support@contraforce.com) or request hands-on onboarding support for your first few customer deployments.