> ## Documentation Index
> Fetch the complete documentation index at: https://docs.contraforce.com/llms.txt
> Use this file to discover all available pages before exploring further.
# Setting Up SCIM Provisioning
> Connect Microsoft Entra ID to ContraForce with SCIM so the people and groups you assign in Entra are added, updated and removed in ContraForce automatically.
Directory sync connects your Microsoft Entra ID tenant to ContraForce over SCIM 2.0. Once it is set up, the people and groups you assign to the ContraForce application in Entra appear in ContraForce on their own, changes to their names and emails follow, and removing someone in Entra removes their access on the next sync.
Entra decides **who** is in your organization and which groups they belong to. ContraForce decides **what** each group may do. New people start with the least privilege, and you grant more access to groups.
**Who is this for?** Organization Admins and User Admins who manage access to ContraForce, together with whoever administers your Microsoft Entra tenant. Setting up the connection takes about 15 minutes. The first sync starts shortly after you turn provisioning on, and then repeats about every 40 minutes.
## Before you start
* You are signed in to ContraForce as an **Org Admin** or a **User Admin**. Only an Org Admin can change the default role for provisioned people.
* Your ContraForce plan includes **SCIM provisioning**. It is included with the Scale plan and available as an add-on. Without it, the **Directory sync** tab shows what the feature includes and a way to contact sales.
* In Microsoft Entra ID you can create enterprise applications and configure provisioning, for example as an **Application Administrator** or **Cloud Application Administrator**.
* To assign **groups** to the application, your tenant needs Microsoft Entra ID P1 or P2. With Entra ID Free you can assign people individually.
## Who decides what
| | Set by Microsoft Entra ID | Set in ContraForce |
| - | - | - |
| Name, email and user name | Yes | No, locked for provisioned people |
| Whether someone can sign in | Yes, through assignment to the application | Emergency removal only (see [Remove someone right away](#remove-someone-right-away)) |
| Which groups someone is in | Yes | No, locked for provisioned groups |
| Group names | Yes | No, locked for provisioned groups |
| Organizational role | No | Yes: the default role, plus roles you grant to groups |
| Workspace access | No | Yes: assign groups to workspaces |
## Step 1: Connect directory sync in ContraForce
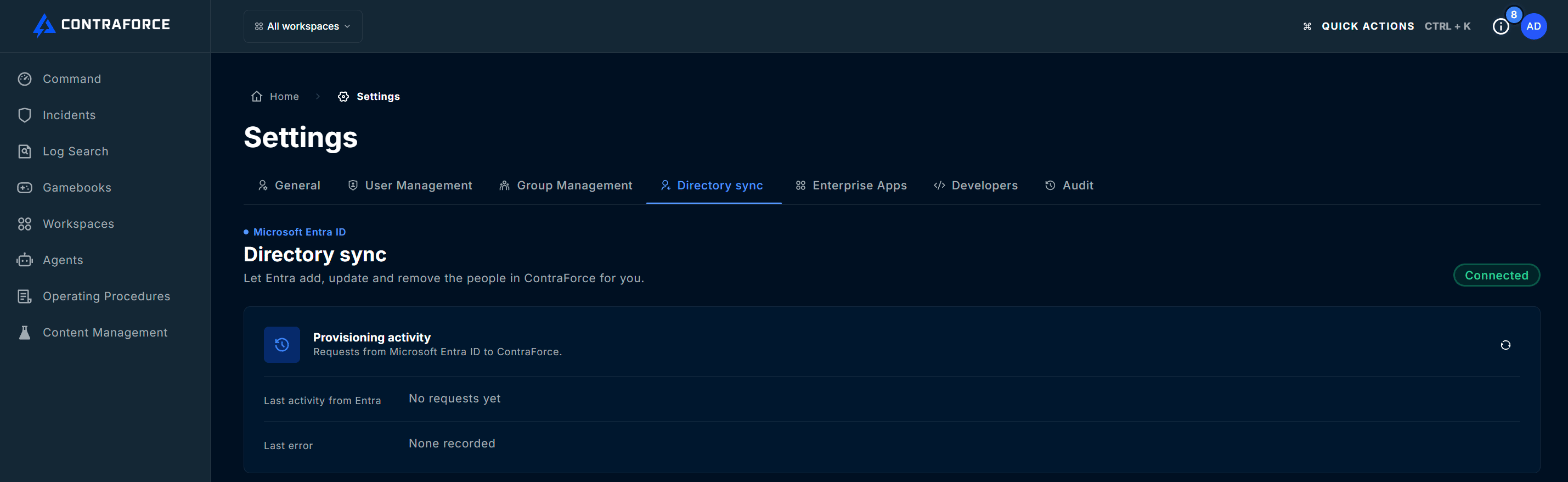
In the left navigation, click **Settings**, then select the **Directory sync** tab. Before you connect, it shows **Not connected**, what directory sync does, and the **Connect with SCIM** button.
Click **Connect with SCIM**. ContraForce creates the connection and opens the **Copy your secret token** window with the **Tenant URL** and the **Secret token**.
The window shows the token only once. ContraForce stores only a hash of it, so it cannot show it again. Copy both values with the copy buttons and keep them somewhere safe until you paste them into Entra in Step 2, then click **I've copied both**.
Treat the secret token like a password. Anyone who holds it can add and remove people in your ContraForce organization. If it is lost or exposed, rotate it (see [Rotate the secret token](#rotate-the-secret-token)).
The tab now shows **Connected**. **Provisioning activity** shows **No requests yet** until Entra makes its first request.
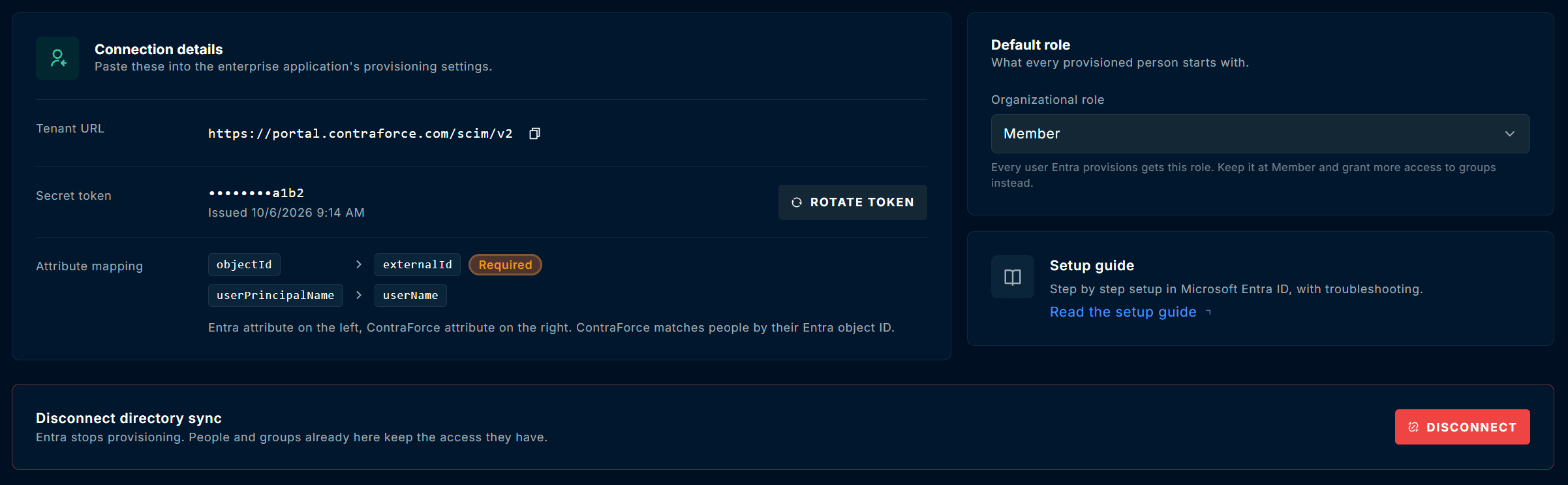
 Below it, **Connection details** shows what you need in Entra:
* **Tenant URL**: the SCIM address of your ContraForce region, ending in `/scim/v2`. Use the copy button next to it.
* **Secret token**: shown masked, with its last four characters and the date it was issued, so you can tell which token Entra holds.
* **Attribute mapping**: the one mapping you must set in Entra, `objectId` to `externalId`.
Below it, **Connection details** shows what you need in Entra:
* **Tenant URL**: the SCIM address of your ContraForce region, ending in `/scim/v2`. Use the copy button next to it.
* **Secret token**: shown masked, with its last four characters and the date it was issued, so you can tell which token Entra holds.
* **Attribute mapping**: the one mapping you must set in Entra, `objectId` to `externalId`.
 ## Step 2: Create the ContraForce application in Microsoft Entra ID
In the [Microsoft Entra admin center](https://entra.microsoft.com), go to **Entra ID** > **Enterprise apps** and click **New application**. Click **Create your own application**, enter a name such as `ContraForce`, keep **Integrate any other application you don't find in the gallery (Non-gallery)** selected, and click **Create**.
## Step 2: Create the ContraForce application in Microsoft Entra ID
In the [Microsoft Entra admin center](https://entra.microsoft.com), go to **Entra ID** > **Enterprise apps** and click **New application**. Click **Create your own application**, enter a name such as `ContraForce`, keep **Integrate any other application you don't find in the gallery (Non-gallery)** selected, and click **Create**.
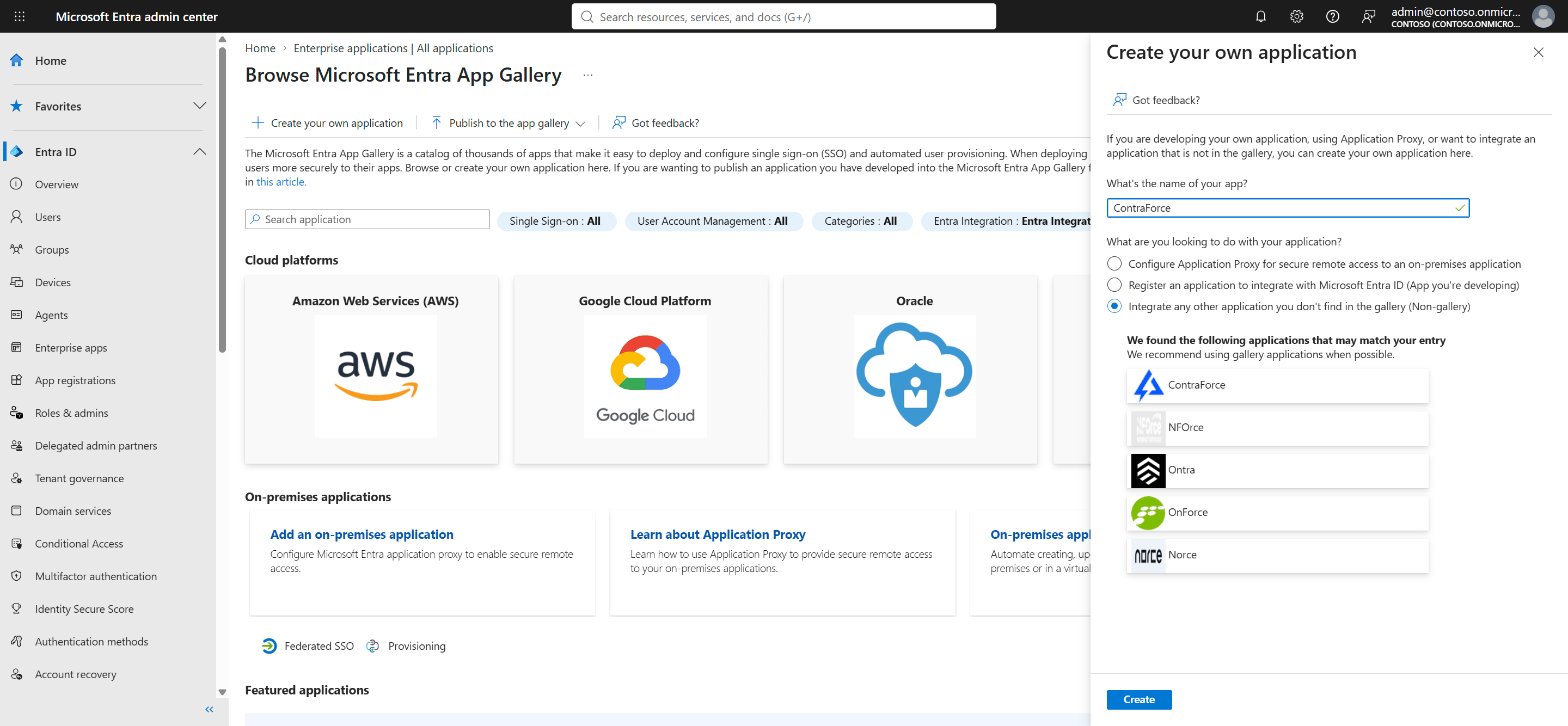 When you type the name, Entra suggests applications from its gallery, including one named ContraForce. Ignore the suggestions and keep the **Non-gallery** option: directory sync needs your own application.
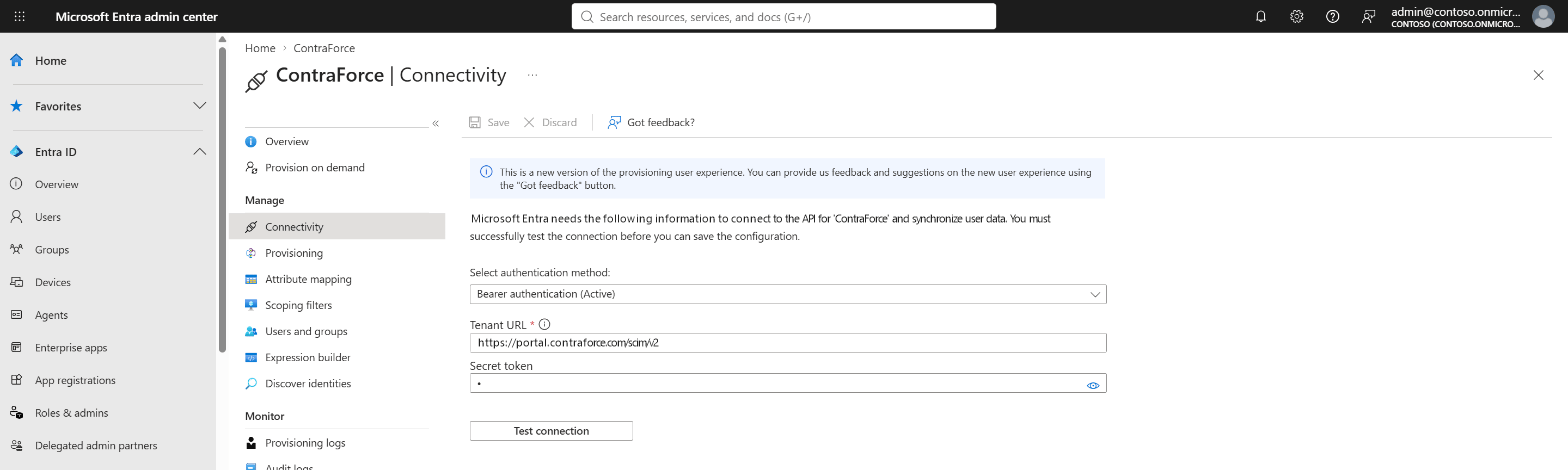
In the new application, open **Provisioning**, then **Connectivity**. Under **Select authentication method**, choose **Bearer authentication**. Paste the ContraForce **Tenant URL** into **Tenant URL** and the secret token into **Secret token**.
Click **Test connection**. Entra confirms that it can reach ContraForce and that the token is accepted. Then click **Save**.
When you type the name, Entra suggests applications from its gallery, including one named ContraForce. Ignore the suggestions and keep the **Non-gallery** option: directory sync needs your own application.
In the new application, open **Provisioning**, then **Connectivity**. Under **Select authentication method**, choose **Bearer authentication**. Paste the ContraForce **Tenant URL** into **Tenant URL** and the secret token into **Secret token**.
Click **Test connection**. Entra confirms that it can reach ContraForce and that the token is accepted. Then click **Save**.
 If the test fails, check that you copied the whole token and the full Tenant URL, and that directory sync shows **Connected** in ContraForce.
These steps follow the current provisioning experience in the Entra admin center. In the legacy experience, the same fields are under **Provisioning** > **Admin Credentials** and **Mappings**.
## Step 3: Map externalId to objectId
ContraForce identifies every person and group by their Microsoft Entra **object ID**. Entra's default mapping for users sends `mailNickname` as `externalId` instead, so change it before you start provisioning.
In the application's provisioning menu, open **Attribute mapping** and select the **Users** tab.
Find the row whose target attribute is **externalId** and click its edit button. Set **Source attribute (Microsoft Entra ID)** to **objectId**, leave **Mapping type** as **Direct**, and click **Apply**. Back on **Attribute mapping**, click **Save**.
If the test fails, check that you copied the whole token and the full Tenant URL, and that directory sync shows **Connected** in ContraForce.
These steps follow the current provisioning experience in the Entra admin center. In the legacy experience, the same fields are under **Provisioning** > **Admin Credentials** and **Mappings**.
## Step 3: Map externalId to objectId
ContraForce identifies every person and group by their Microsoft Entra **object ID**. Entra's default mapping for users sends `mailNickname` as `externalId` instead, so change it before you start provisioning.
In the application's provisioning menu, open **Attribute mapping** and select the **Users** tab.
Find the row whose target attribute is **externalId** and click its edit button. Set **Source attribute (Microsoft Entra ID)** to **objectId**, leave **Mapping type** as **Direct**, and click **Apply**. Back on **Attribute mapping**, click **Save**.
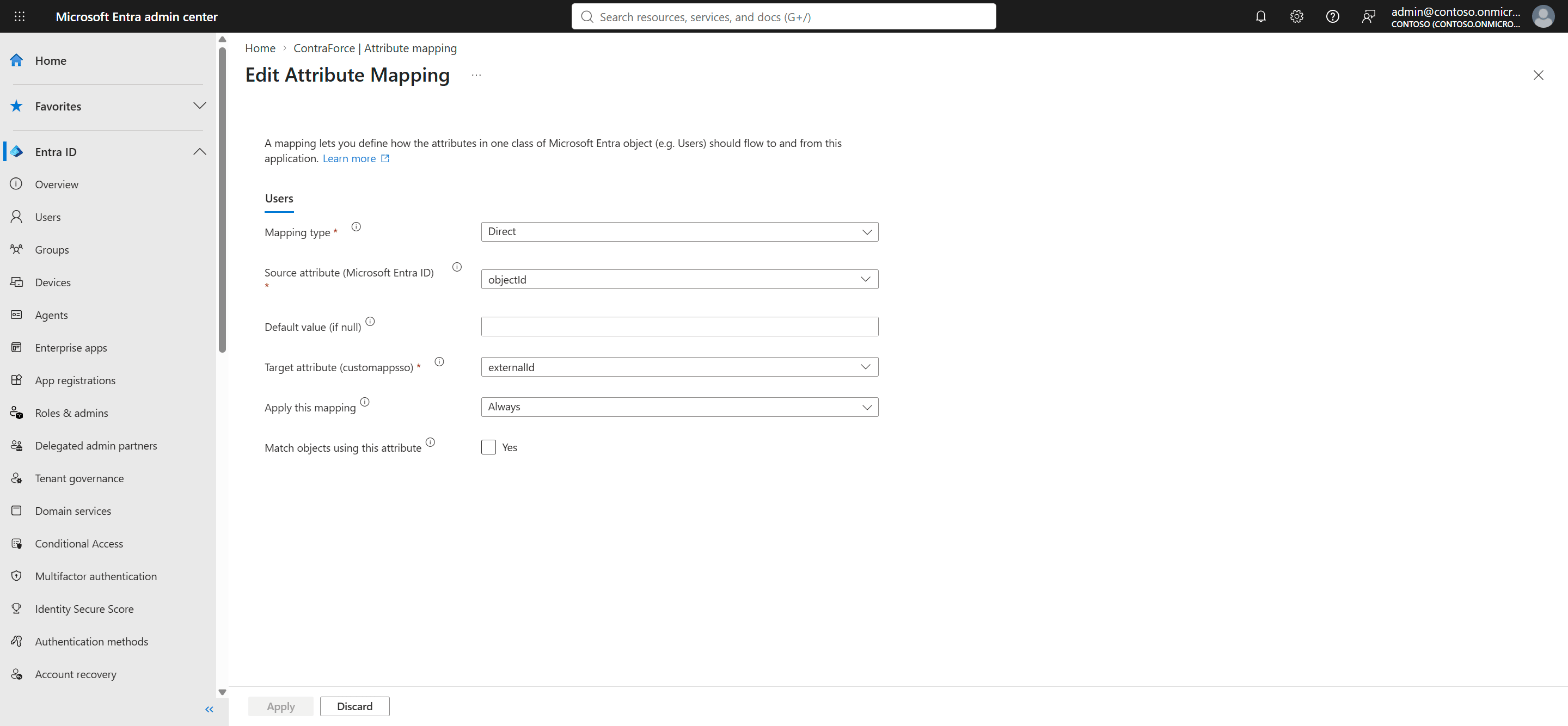 Keep **userPrincipalName** mapped to **userName**. ContraForce uses these attributes and ignores the others in the default list, so you can leave them in place:
| Microsoft Entra ID attribute | ContraForce attribute |
| - | - |
| `objectId` | `externalId` (required) |
| `userPrincipalName` | `userName` |
| `givenName` | `name.givenName` |
| `surname` | `name.familyName` |
| `displayName` | `displayName` |
| `mail` | `emails[type eq "work"].value` |
| `Switch([IsSoftDeleted], ...)` | `active` |
Select the **Groups** tab. Confirm that **objectId** is mapped to **externalId**, along with **displayName** and **members**. These are Entra's defaults for groups, so there is usually nothing to change.
Keep **userPrincipalName** mapped to **userName**. ContraForce uses these attributes and ignores the others in the default list, so you can leave them in place:
| Microsoft Entra ID attribute | ContraForce attribute |
| - | - |
| `objectId` | `externalId` (required) |
| `userPrincipalName` | `userName` |
| `givenName` | `name.givenName` |
| `surname` | `name.familyName` |
| `displayName` | `displayName` |
| `mail` | `emails[type eq "work"].value` |
| `Switch([IsSoftDeleted], ...)` | `active` |
Select the **Groups** tab. Confirm that **objectId** is mapped to **externalId**, along with **displayName** and **members**. These are Entra's defaults for groups, so there is usually nothing to change.
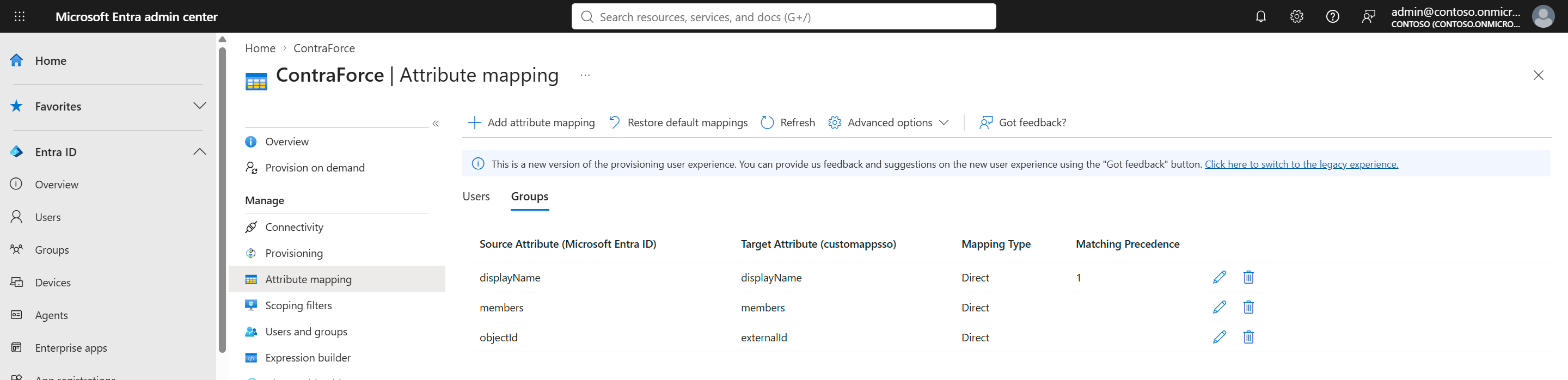 Without the `objectId` mapping, ContraForce refuses every user and group Entra sends, with the error `externalId must be the user's Microsoft Entra object ID` in the Entra provisioning logs.
## Step 4: Choose scope and safety settings
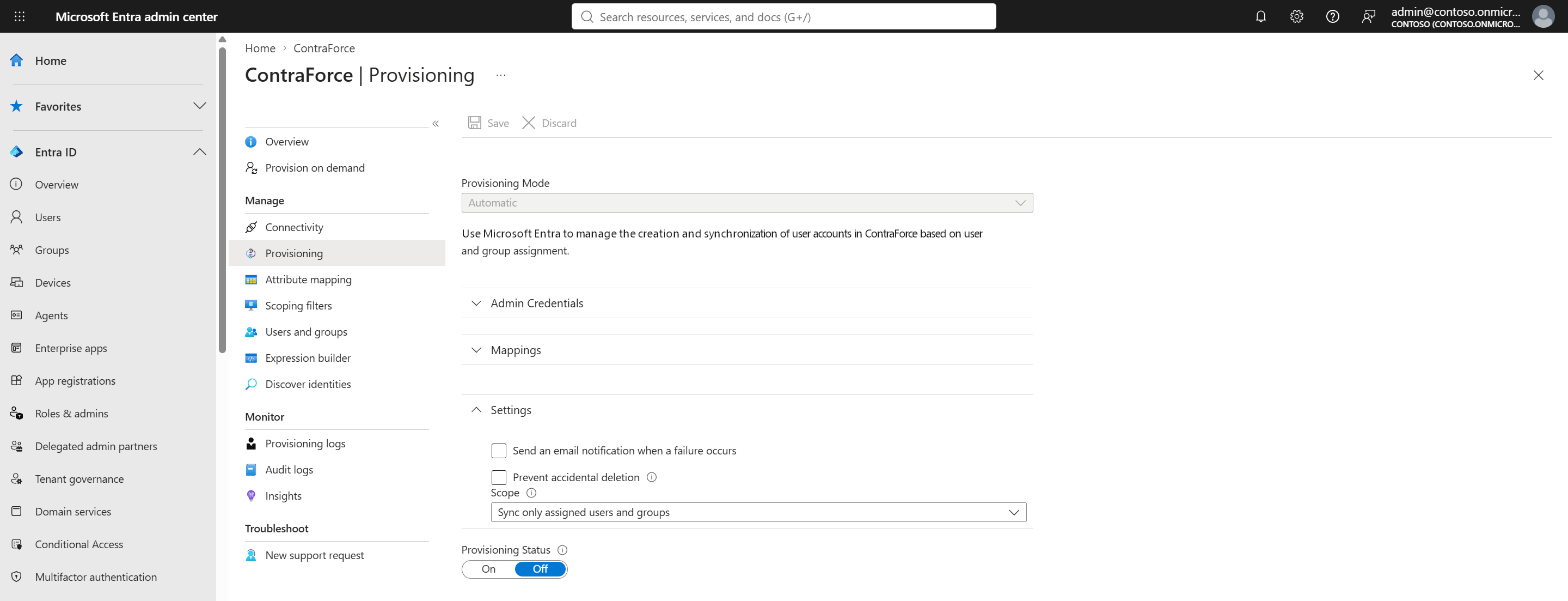
In the application's provisioning menu, open **Provisioning** and expand **Settings**:
* Set **Scope** to **Sync only assigned users and groups**, so only the people and groups you assign to the application get access to ContraForce.
* Select **Prevent accidental deletion** and set a threshold. Entra then pauses provisioning instead of removing many people at once, for example after a mistaken change to a group.
* Select **Send an email notification when a failure occurs** and enter a mailbox your team watches.
Leave **Provisioning Status** set to **Off** for now, and click **Save**.
Without the `objectId` mapping, ContraForce refuses every user and group Entra sends, with the error `externalId must be the user's Microsoft Entra object ID` in the Entra provisioning logs.
## Step 4: Choose scope and safety settings
In the application's provisioning menu, open **Provisioning** and expand **Settings**:
* Set **Scope** to **Sync only assigned users and groups**, so only the people and groups you assign to the application get access to ContraForce.
* Select **Prevent accidental deletion** and set a threshold. Entra then pauses provisioning instead of removing many people at once, for example after a mistaken change to a group.
* Select **Send an email notification when a failure occurs** and enter a mailbox your team watches.
Leave **Provisioning Status** set to **Off** for now, and click **Save**.
 ## Step 5: Assign people and start provisioning
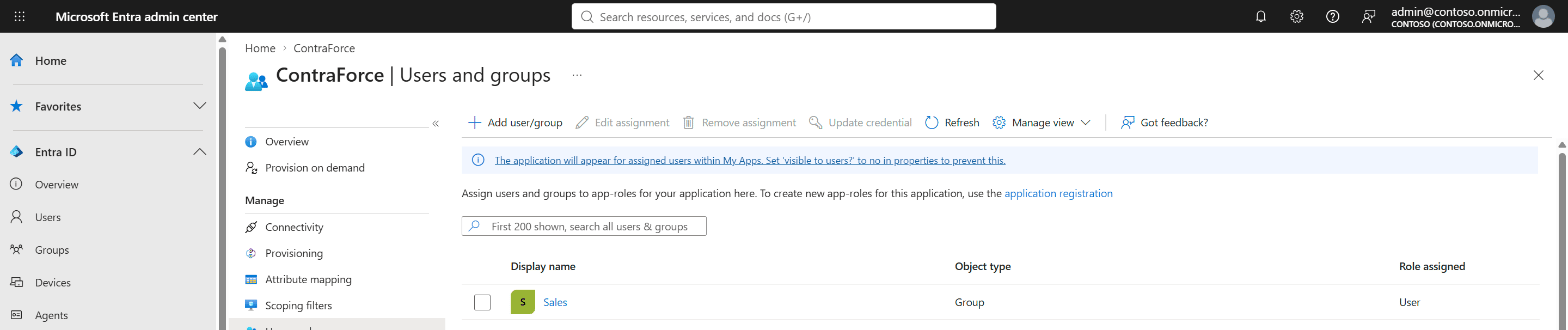
In the provisioning menu, open **Users and groups**, click **Add user/group**, and select the people and groups who should use ContraForce.
Assign the groups you plan to grant access to in ContraForce, such as your SOC analysts or your admins. Everyone in an assigned group is provisioned.
## Step 5: Assign people and start provisioning
In the provisioning menu, open **Users and groups**, click **Add user/group**, and select the people and groups who should use ContraForce.
Assign the groups you plan to grant access to in ContraForce, such as your SOC analysts or your admins. Everyone in an assigned group is provisioned.
 Before turning on provisioning for everyone, open **Provision on demand**, search for one assigned user, and click **Provision**. Entra shows each step and the result. The person then appears in ContraForce under **Settings** > **User Management**.
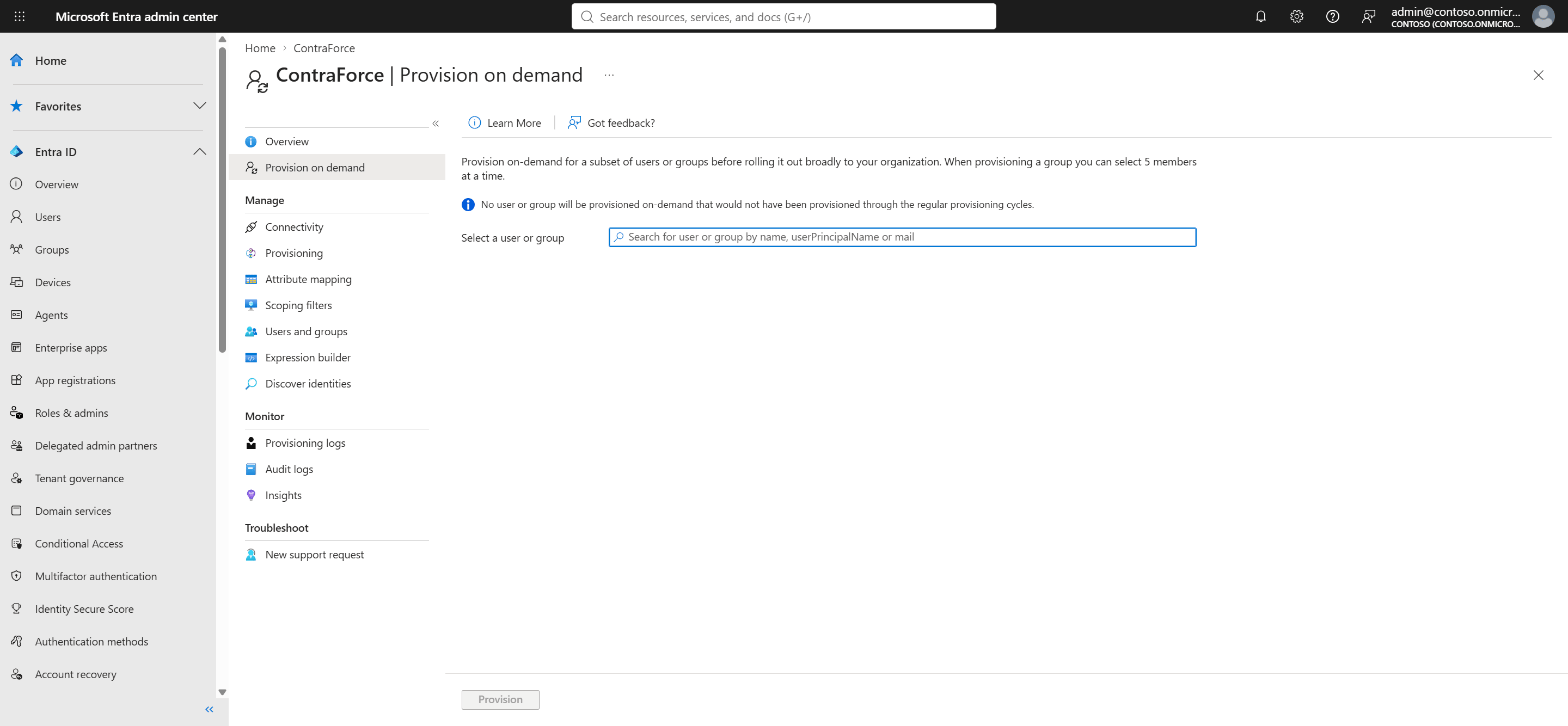 Open the provisioning **Overview** and click **Start provisioning**, or set **Provisioning Status** to **On** on the **Provisioning** page and click **Save**. The first cycle provisions everyone in scope. Later cycles run about every 40 minutes and send only changes.
 ## Step 6: Confirm in ContraForce
Back on the **Directory sync** tab, **Provisioning activity** shows when Entra last contacted ContraForce and the last error it was sent, if any. Click the refresh button to update it.
In **Settings** > **User Management** and **Group Management**, everyone and every group Entra provisioned is marked **Managed by Entra**. See [Tell Entra-managed and manual users apart](#tell-entra-managed-and-manual-users-apart) for what that changes.
## Tell Entra-managed and manual users apart
Once directory sync is on, your organization can have two kinds of people and groups side by side: those Microsoft Entra ID provisions, and those added by hand in ContraForce. ContraForce marks the ones Entra manages wherever you might try to change them.
### In User Management
* **Managed by Entra chip:** people Entra provisioned show a **Managed by Entra** chip next to their name. People added by hand have no chip.
* **Organizational role:** for people Entra manages, the role list is locked and a line under it explains where the role comes from:
* **Managed by Microsoft Entra ID. The role follows the default for provisioned users and the groups Entra puts them in.** when the role is the default role.
* **Managed by Microsoft Entra ID. Role granted by group** followed by the group's name, when a group grants it.
* **User details:** opening an Entra-managed person shows **Managed by Microsoft Entra ID**: Entra sets their name and email, and their organizational role follows the default role and their groups.
* **Removing someone:** the confirmation for an Entra-managed person reminds you to also unassign them in Entra, or Entra adds them back on its next sync. See [Remove someone right away](#remove-someone-right-away).
* **Directory sync is on:** this button replaces **Sync users** in the header and opens the **Directory sync** tab. The older user sync no longer applies once Entra provisions your people. **Add user** still works for people you add by hand.
### In Group Management
* **Managed by Entra chip:** groups Entra provisioned show the same chip next to their name.
* **Group details:** opening an Entra-managed group shows **Managed by Microsoft Entra ID**: Entra sets the group's name and members, while its workspace roles and organizational role are set in ContraForce. The details also show the group's **Organizational role**, or **None**.
* **Edit group:** the name is locked (**The name is managed in Microsoft Entra ID and cannot be edited here.**) and so are the members (**Members are provisioned by Microsoft Entra ID. They cannot be edited here.**). The description stays editable, and an **Organizational role** field appears that groups added by hand do not have.
### What you can change for each
| | Added by hand in ContraForce | Managed by Entra |
| - | - | - |
| Marked in the list | No chip | **Managed by Entra** chip |
| Name and email (people) | Set in ContraForce | Set by Entra, locked |
| Organizational role (people) | Set by an admin in **User Management** | Follows the default role and the person's groups, locked |
| Name and members (groups) | Edited in ContraForce | Set by Entra, locked |
| Organizational role (groups) | Not available | Set in **Edit group** |
| Workspace access (groups) | Assign the group to workspaces | Assign the group to workspaces |
| Removing access | Remove in ContraForce | Unassign in Entra; for immediate effect, also remove in ContraForce |
## How access works
### Everyone starts with the default role
Every person Entra provisions gets the **default role** set on the **Directory sync** tab. It starts as **Member**, the least privileged organizational role, and it can never be Org Admin. Only an Org Admin can change it. Changing it moves every provisioned person whose role comes from the default; people a group grants a higher role keep it.
New people have no workspace access until a group gives it to them.
### Groups grant more access
Groups you provision from Entra work like any ContraForce group, with Entra deciding who is in them:
* **Workspace access:** assign the group to workspaces with a workspace role, as you would any group. Its members get that access, and lose it when Entra removes them from the group.
* **Organizational role:** in **Settings** > **Group Management**, click **Edit group** on a provisioned group and choose an **Organizational role**, then click **Save changes**. Members hold that role for as long as Microsoft Entra ID keeps them in the group.
When someone is in several groups, they get the **most privileged** role any of them grants, or the default role if that is higher. An Org Admin can make a group grant any organizational role. A User Admin can make a group grant **Member** only.
Only groups provisioned from Entra can grant an organizational role. The name and members of a provisioned group are locked in ContraForce; its description, workspace roles and organizational role are not.
### People who already use ContraForce
When you assign someone who already has a ContraForce account, Entra takes them over instead of creating a duplicate. ContraForce matches them by their Entra object ID, which is the identity they already sign in with. From then on, Entra manages their name and email.
Their organizational role stays as it is until Entra first changes their group memberships. After that it follows the default role and their groups, like everyone else Entra provisions. Make sure the groups that should grant Org Admin are assigned and set up before you rely on this, so no admin loses access.
Groups created by hand in ContraForce are never taken over. If an Entra group has the same name as one of them, see [Troubleshooting](#troubleshooting).
### When someone leaves or changes teams
* **Removed from a group in Entra:** on the next cycle, they lose the workspace access and organizational role that group granted.
* **Unassigned from the application, or disabled in Entra:** on the next cycle, their ContraForce account is deactivated and they can no longer sign in. Their role and workspace access are kept, so assigning them again restores them.
* **Deleted in Entra:** once Entra deletes them for good, ContraForce removes them from the organization.
Changes reach ContraForce on the next cycle, about every 40 minutes. To make one take effect immediately, use **Provision on demand** for that person in Entra.
### Remove someone right away
To cut off access immediately, remove the person in ContraForce under **Settings** > **User Management**. Their access ends at once. Also unassign them from the ContraForce application in Entra; otherwise Entra adds them back on its next sync.
### People you add by hand
You can still invite people from **User Management**. They are not managed by Entra, and you set their role in ContraForce as before. People Entra provisions cannot be added by hand or have their role changed in ContraForce.
### Your last Org Admin is protected
ContraForce never lets Entra deactivate, delete or demote the organization's last active Org Admin. Entra reports an error for that person instead. Make another person an Org Admin in ContraForce first.
## Manage the connection
### Check provisioning activity
The **Provisioning activity** card on the **Directory sync** tab shows:
* **Last activity from Entra:** when Entra last contacted ContraForce.
* **Last error:** the status and detail of the last request ContraForce refused, the same text Entra shows in its provisioning logs.
If Entra has not contacted ContraForce for more than two hours, the card warns: **Entra hasn't contacted ContraForce recently. Check that provisioning is started in Entra.** The two hours count from the later of Entra's last request and the moment the current token was issued, so a connection you just set up is not flagged before Entra has had time to call.
## Step 6: Confirm in ContraForce
Back on the **Directory sync** tab, **Provisioning activity** shows when Entra last contacted ContraForce and the last error it was sent, if any. Click the refresh button to update it.
In **Settings** > **User Management** and **Group Management**, everyone and every group Entra provisioned is marked **Managed by Entra**. See [Tell Entra-managed and manual users apart](#tell-entra-managed-and-manual-users-apart) for what that changes.
## Tell Entra-managed and manual users apart
Once directory sync is on, your organization can have two kinds of people and groups side by side: those Microsoft Entra ID provisions, and those added by hand in ContraForce. ContraForce marks the ones Entra manages wherever you might try to change them.
### In User Management
* **Managed by Entra chip:** people Entra provisioned show a **Managed by Entra** chip next to their name. People added by hand have no chip.
* **Organizational role:** for people Entra manages, the role list is locked and a line under it explains where the role comes from:
* **Managed by Microsoft Entra ID. The role follows the default for provisioned users and the groups Entra puts them in.** when the role is the default role.
* **Managed by Microsoft Entra ID. Role granted by group** followed by the group's name, when a group grants it.
* **User details:** opening an Entra-managed person shows **Managed by Microsoft Entra ID**: Entra sets their name and email, and their organizational role follows the default role and their groups.
* **Removing someone:** the confirmation for an Entra-managed person reminds you to also unassign them in Entra, or Entra adds them back on its next sync. See [Remove someone right away](#remove-someone-right-away).
* **Directory sync is on:** this button replaces **Sync users** in the header and opens the **Directory sync** tab. The older user sync no longer applies once Entra provisions your people. **Add user** still works for people you add by hand.
### In Group Management
* **Managed by Entra chip:** groups Entra provisioned show the same chip next to their name.
* **Group details:** opening an Entra-managed group shows **Managed by Microsoft Entra ID**: Entra sets the group's name and members, while its workspace roles and organizational role are set in ContraForce. The details also show the group's **Organizational role**, or **None**.
* **Edit group:** the name is locked (**The name is managed in Microsoft Entra ID and cannot be edited here.**) and so are the members (**Members are provisioned by Microsoft Entra ID. They cannot be edited here.**). The description stays editable, and an **Organizational role** field appears that groups added by hand do not have.
### What you can change for each
| | Added by hand in ContraForce | Managed by Entra |
| - | - | - |
| Marked in the list | No chip | **Managed by Entra** chip |
| Name and email (people) | Set in ContraForce | Set by Entra, locked |
| Organizational role (people) | Set by an admin in **User Management** | Follows the default role and the person's groups, locked |
| Name and members (groups) | Edited in ContraForce | Set by Entra, locked |
| Organizational role (groups) | Not available | Set in **Edit group** |
| Workspace access (groups) | Assign the group to workspaces | Assign the group to workspaces |
| Removing access | Remove in ContraForce | Unassign in Entra; for immediate effect, also remove in ContraForce |
## How access works
### Everyone starts with the default role
Every person Entra provisions gets the **default role** set on the **Directory sync** tab. It starts as **Member**, the least privileged organizational role, and it can never be Org Admin. Only an Org Admin can change it. Changing it moves every provisioned person whose role comes from the default; people a group grants a higher role keep it.
New people have no workspace access until a group gives it to them.
### Groups grant more access
Groups you provision from Entra work like any ContraForce group, with Entra deciding who is in them:
* **Workspace access:** assign the group to workspaces with a workspace role, as you would any group. Its members get that access, and lose it when Entra removes them from the group.
* **Organizational role:** in **Settings** > **Group Management**, click **Edit group** on a provisioned group and choose an **Organizational role**, then click **Save changes**. Members hold that role for as long as Microsoft Entra ID keeps them in the group.
When someone is in several groups, they get the **most privileged** role any of them grants, or the default role if that is higher. An Org Admin can make a group grant any organizational role. A User Admin can make a group grant **Member** only.
Only groups provisioned from Entra can grant an organizational role. The name and members of a provisioned group are locked in ContraForce; its description, workspace roles and organizational role are not.
### People who already use ContraForce
When you assign someone who already has a ContraForce account, Entra takes them over instead of creating a duplicate. ContraForce matches them by their Entra object ID, which is the identity they already sign in with. From then on, Entra manages their name and email.
Their organizational role stays as it is until Entra first changes their group memberships. After that it follows the default role and their groups, like everyone else Entra provisions. Make sure the groups that should grant Org Admin are assigned and set up before you rely on this, so no admin loses access.
Groups created by hand in ContraForce are never taken over. If an Entra group has the same name as one of them, see [Troubleshooting](#troubleshooting).
### When someone leaves or changes teams
* **Removed from a group in Entra:** on the next cycle, they lose the workspace access and organizational role that group granted.
* **Unassigned from the application, or disabled in Entra:** on the next cycle, their ContraForce account is deactivated and they can no longer sign in. Their role and workspace access are kept, so assigning them again restores them.
* **Deleted in Entra:** once Entra deletes them for good, ContraForce removes them from the organization.
Changes reach ContraForce on the next cycle, about every 40 minutes. To make one take effect immediately, use **Provision on demand** for that person in Entra.
### Remove someone right away
To cut off access immediately, remove the person in ContraForce under **Settings** > **User Management**. Their access ends at once. Also unassign them from the ContraForce application in Entra; otherwise Entra adds them back on its next sync.
### People you add by hand
You can still invite people from **User Management**. They are not managed by Entra, and you set their role in ContraForce as before. People Entra provisions cannot be added by hand or have their role changed in ContraForce.
### Your last Org Admin is protected
ContraForce never lets Entra deactivate, delete or demote the organization's last active Org Admin. Entra reports an error for that person instead. Make another person an Org Admin in ContraForce first.
## Manage the connection
### Check provisioning activity
The **Provisioning activity** card on the **Directory sync** tab shows:
* **Last activity from Entra:** when Entra last contacted ContraForce.
* **Last error:** the status and detail of the last request ContraForce refused, the same text Entra shows in its provisioning logs.
If Entra has not contacted ContraForce for more than two hours, the card warns: **Entra hasn't contacted ContraForce recently. Check that provisioning is started in Entra.** The two hours count from the later of Entra's last request and the moment the current token was issued, so a connection you just set up is not flagged before Entra has had time to call.
 ### Rotate the secret token
Click **Rotate token** on the **Directory sync** tab and confirm. The current token stops working right away, and provisioning pauses until you paste the new token into the application's **Admin Credentials** in Entra and save.
### Change the default role
Choose a role under **Default role** and confirm. Only an Org Admin can do this, and Org Admin itself is never available as the default. Grant admin rights through a group instead.
### Disconnect
Click **Disconnect** under **Disconnect directory sync** and confirm. ContraForce stops accepting provisioning requests from Entra. People and groups already provisioned stay, with the access they have now. Connecting again issues a new secret token. Also stop provisioning in Entra, so it does not keep retrying.
## Troubleshooting
Entra shows the error ContraForce sent for each failed change in the application's **Provisioning logs**. The **Provisioning activity** card shows the most recent one.
| Error | Cause | Fix |
| - | - | - |
| `The SCIM token is missing, invalid, or no longer active.` | The token was rotated, directory sync was disconnected, or the token was copied incompletely. | Rotate the token in ContraForce, paste the new one into **Admin Credentials** in Entra, then **Test Connection** and **Save**. |
| `SCIM provisioning is not included in this organization's ContraForce plan.` | The organization's plan does not include SCIM provisioning. | Add SCIM provisioning to your plan, then restart provisioning in Entra. |
| `externalId must be the user's Microsoft Entra object ID.` (or `the group's`) | `externalId` is not mapped to `objectId`. | Map `objectId` to `externalId` (see [Step 3](#step-3-map-externalid-to-objectid)), then restart provisioning. |
| `This Microsoft Entra user already belongs to another ContraForce organization.` | A person can belong to only one ContraForce organization. | Remove them from the other organization first, or unassign them from this application. |
| `A group named '' already exists in ContraForce. Rename the group in ContraForce or in Entra, then retry.` | A group created by hand in ContraForce has the same name. ContraForce never takes over hand-made groups. | Rename one of the two groups. The next cycle creates the Entra group. |
| `This user is the organization's last active ContraForce admin and cannot be deactivated.` (also `deleted` or `demote`) | The change would leave the organization without an active Org Admin. | Make another person an Org Admin in ContraForce, then retry provisioning. |
| `This ContraForce user is linked to a different Entra identity.` | The person in ContraForce signs in with a different Entra account than the one Entra is sending. | Check that you assigned the right person. If the ContraForce account is wrong, remove it in ContraForce and let Entra provision the person. |
| `This ContraForce user is not linked to an Entra identity yet.` | The account was created in ContraForce without an Entra identity, so ContraForce cannot confirm it is the same person. | Remove the person in ContraForce and let Entra provision them. |
| **Entra hasn't contacted ContraForce recently.** | Provisioning is stopped or in quarantine in Entra, or the token stopped working. | Open provisioning in Entra, check its status and logs, and start it again. |
## Related
* [Microsoft: Configure an app for automatic user provisioning](https://learn.microsoft.com/entra/identity/app-provisioning/configure-automatic-user-provisioning-portal)
* [Microsoft: Provision on demand](https://learn.microsoft.com/entra/identity/app-provisioning/provision-on-demand)
* [Microsoft: Enable accidental deletion prevention](https://learn.microsoft.com/entra/identity/app-provisioning/accidental-deletions)
This documentation is built and hosted on [Mintlify](https://mintlify.com), a developer documentation platform.
### Rotate the secret token
Click **Rotate token** on the **Directory sync** tab and confirm. The current token stops working right away, and provisioning pauses until you paste the new token into the application's **Admin Credentials** in Entra and save.
### Change the default role
Choose a role under **Default role** and confirm. Only an Org Admin can do this, and Org Admin itself is never available as the default. Grant admin rights through a group instead.
### Disconnect
Click **Disconnect** under **Disconnect directory sync** and confirm. ContraForce stops accepting provisioning requests from Entra. People and groups already provisioned stay, with the access they have now. Connecting again issues a new secret token. Also stop provisioning in Entra, so it does not keep retrying.
## Troubleshooting
Entra shows the error ContraForce sent for each failed change in the application's **Provisioning logs**. The **Provisioning activity** card shows the most recent one.
| Error | Cause | Fix |
| - | - | - |
| `The SCIM token is missing, invalid, or no longer active.` | The token was rotated, directory sync was disconnected, or the token was copied incompletely. | Rotate the token in ContraForce, paste the new one into **Admin Credentials** in Entra, then **Test Connection** and **Save**. |
| `SCIM provisioning is not included in this organization's ContraForce plan.` | The organization's plan does not include SCIM provisioning. | Add SCIM provisioning to your plan, then restart provisioning in Entra. |
| `externalId must be the user's Microsoft Entra object ID.` (or `the group's`) | `externalId` is not mapped to `objectId`. | Map `objectId` to `externalId` (see [Step 3](#step-3-map-externalid-to-objectid)), then restart provisioning. |
| `This Microsoft Entra user already belongs to another ContraForce organization.` | A person can belong to only one ContraForce organization. | Remove them from the other organization first, or unassign them from this application. |
| `A group named '' already exists in ContraForce. Rename the group in ContraForce or in Entra, then retry.` | A group created by hand in ContraForce has the same name. ContraForce never takes over hand-made groups. | Rename one of the two groups. The next cycle creates the Entra group. |
| `This user is the organization's last active ContraForce admin and cannot be deactivated.` (also `deleted` or `demote`) | The change would leave the organization without an active Org Admin. | Make another person an Org Admin in ContraForce, then retry provisioning. |
| `This ContraForce user is linked to a different Entra identity.` | The person in ContraForce signs in with a different Entra account than the one Entra is sending. | Check that you assigned the right person. If the ContraForce account is wrong, remove it in ContraForce and let Entra provision the person. |
| `This ContraForce user is not linked to an Entra identity yet.` | The account was created in ContraForce without an Entra identity, so ContraForce cannot confirm it is the same person. | Remove the person in ContraForce and let Entra provision them. |
| **Entra hasn't contacted ContraForce recently.** | Provisioning is stopped or in quarantine in Entra, or the token stopped working. | Open provisioning in Entra, check its status and logs, and start it again. |
## Related
* [Microsoft: Configure an app for automatic user provisioning](https://learn.microsoft.com/entra/identity/app-provisioning/configure-automatic-user-provisioning-portal)
* [Microsoft: Provision on demand](https://learn.microsoft.com/entra/identity/app-provisioning/provision-on-demand)
* [Microsoft: Enable accidental deletion prevention](https://learn.microsoft.com/entra/identity/app-provisioning/accidental-deletions)
This documentation is built and hosted on [Mintlify](https://mintlify.com), a developer documentation platform.